By: Team W13-B1 Since: Mar 2018 Licence: MIT
- 1. Introduction
- 2. Setting up
- 3. Design
- 4. Implementation
- 5. Documentation
- 6. Testing
- 7. Dev Ops
- Appendix A: Suggested Programming Tasks to Get Started
- Appendix B: Product Scope
- Appendix C: User Stories
- Appendix D: Use Cases
- Appendix E: Non Functional Requirements
- Appendix F: Glossary
- Appendix G: Product Survey
- Appendix H: Instructions for Manual Testing
- H.1. Launch and Shutdown
- H.2. Deleting a person
- H.3. Adding an Order
- H.4. Editing an Order
- H.5. Changing Order Status
- H.6. Deleting an Order
- H.7. Changing the Theme
- H.8. Adding a Calendar Entry
- H.9. Deleting a Calendar Entry
- H.10. Editing a Calendar Entry
- H.11. Changing Calendar View
- H.12. Changing displayed date in Calendar
- H.13. Changing displayed page in Calendar
1. Introduction
ContactSails is a desktop application targeted at salespersons who want to manage their customer contacts, sales orders,
and calendar events in an efficient manner.
This guide provides the necessary technical information for those
who might want to join our team as a software developer or a tester,
or for those who want to develop an entirely different product by using ContactSails as a base.
The following points illustrate what information this guide provides:
-
Details about the software architecture and how each component of the application is designed.
-
Implementation details of some noteworthy features in the application.
-
Details about software testing, documentation, and dev ops.
2. Setting up
This section will guide you in setting up the developer environment on your computer for coding and testing purposes.
2.1. Prerequisites
Ensure that you have the following prerequisites for successfully setting up the developer environment:
-
JDK
1.8.0_60or laterThe Java JDK is a software development kit that includes a runtime environment and tools for developing, debugging, and monitoring Java applications. You can download it here.
ContactSails will not work with earlier versions of Java 8, so ensure that you have installed the right version of Java 8. -
IntelliJ IDEA
IntelliJ IDEA is a Java integrated development environment for developing computer software. You can download the (free) community edition here.
IntelliJ by default has Gradle and JavaFx plugins installed.
Do not disable them. If you have disabled them, go toFile>Settings>Pluginsto re-enable them.
2.2. Setting up the project on your computer
Follow these steps to set up the project on your computer:
-
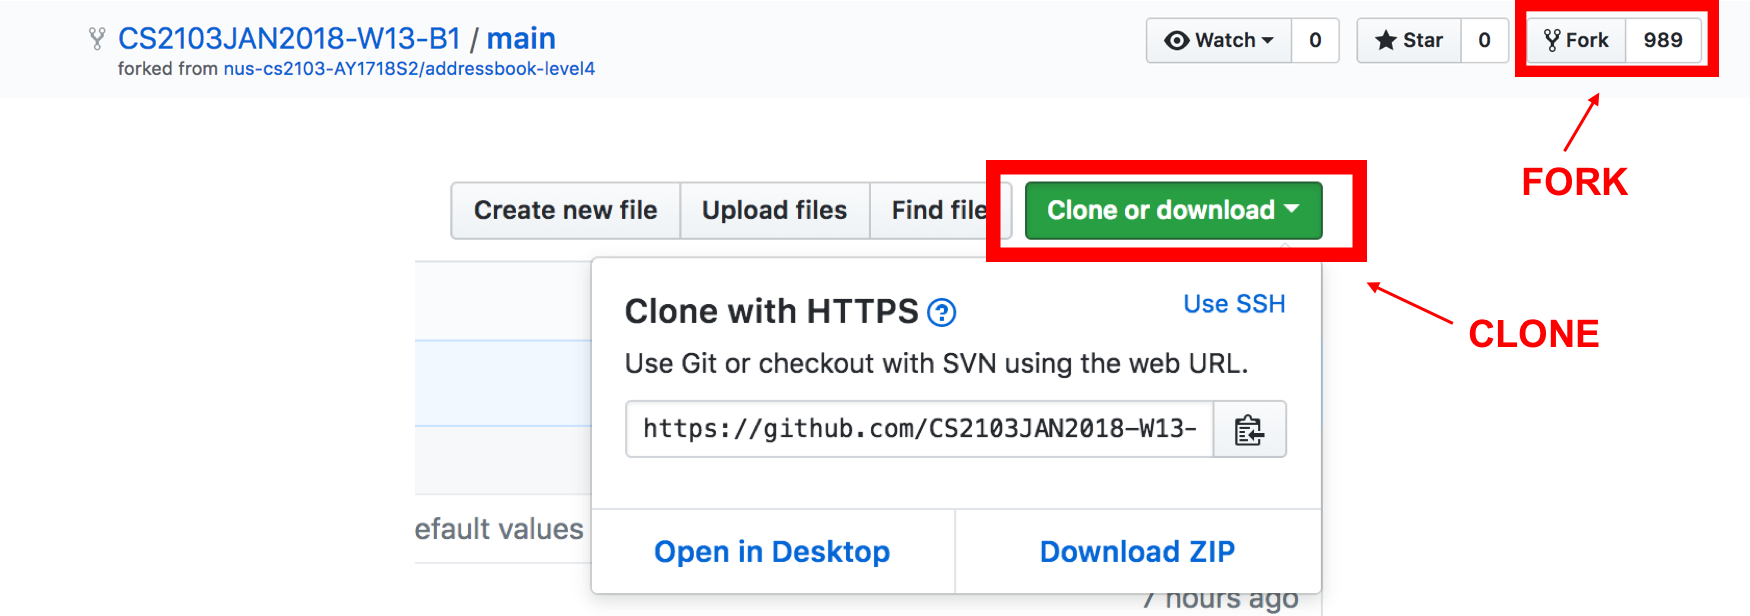
Fork this repo, and clone the fork to your computer.
-
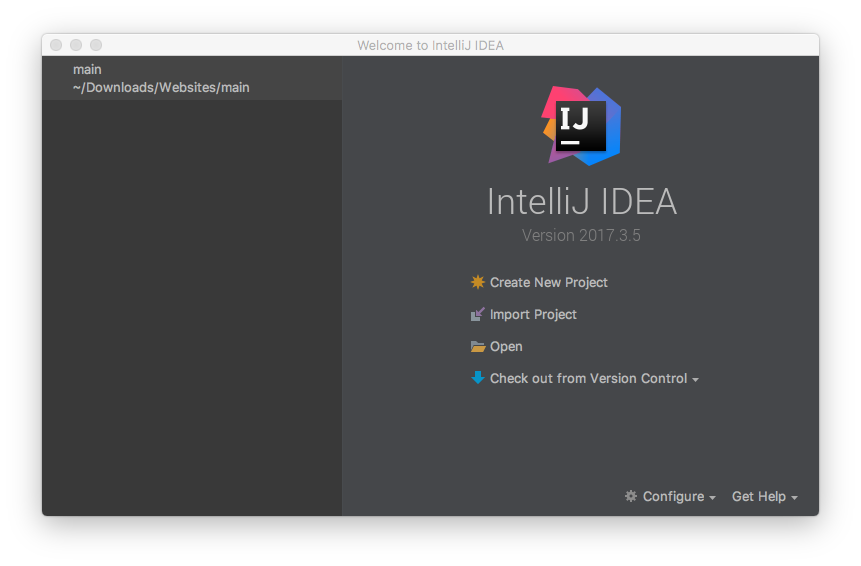
Open IntelliJ. You should see the Welcome Screen (shown in the figure below).
If you are not in the welcome screen, click File>Close Projectto close the existing project dialog first.
-
Set up the correct JDK version for Gradle:
-
Click
Configure>Project Defaults>Project Structure. -
Click
New…and find the directory of the JDK.
-
-
Click
Import Project. -
Locate the
build.gradlefile in the ContactSails repository directory and select it. ClickOK. -
Click
Open as Project. -
Click
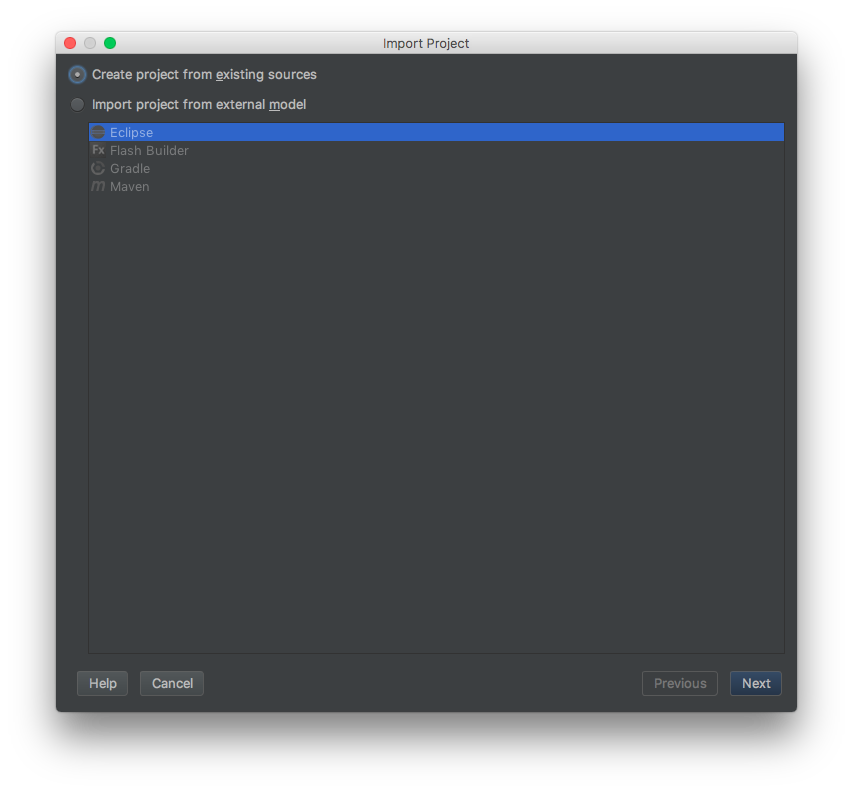
OKto accept the default settings. You will now be directed to theImport Projectwindow, as shown below.
-
Click
Nextrepeatedly to import the project with the default settings until you reach the last window (this window will have aFinishbutton). -
Click
Finishto finish importing the project. -
Open the
Terminaland run the commandgradlew processResources(run./gradlew processResourcesfor Mac/Linux). It should finish with theBUILD SUCCESSFULmessage.
This generates all the resources required by the application and tests.
2.3. Verifying the setup
Follow these steps to verify that the project has been setup correctly:
-
Run the
seedu.address.MainAppand try a few commands. -
Run the tests to ensure they all pass.
2.4. Configurations to do before writing code
This section provides information on the additional configurations that you need to setup before you can start writing code.
2.4.1. Configuring the coding style
This project follows oss-generic coding standards. IntelliJ’s default style is mostly compliant with ours but it uses a different import order from ours.
To use the correct coding style, follow these steps:
-
Go to
File>Settings…(Windows/Linux), orIntelliJ IDEA>Preferences…(macOS). -
Select
Editor>Code Style>Java. -
Click on the
Importstab to set the order:-
For
Class count to use import with '*'andNames count to use static import with '*': Set to999to prevent IntelliJ from contracting the import statements. -
For
Import Layout: The order isimport static all other imports,import java.*,import javax.*,import org.*,import com.*,import all other imports. Add a<blank line>between eachimport.
-
Optionally, you can follow the UsingCheckstyle.adoc document to configure Intellij to check style-compliance as you write code.
2.4.2. Updating documentation to match your fork
After forking the repo, links in the documentation will still point to the CS2103JAN2018-W13-B1/main repo. If you plan to develop this as a separate product (i.e. instead of contributing to the CS2103JAN2018-W13-B1/main repo), you should replace the URL in the variable repoURL in DeveloperGuide.adoc and UserGuide.adoc with the URL of your fork.
2.4.3. Setting up CI
Set up Travis to perform Continuous Integration (CI) for your fork. See UsingTravis.adoc to learn how to set it up.
After setting up Travis, you can optionally set up coverage reporting for your team fork see UsingCoveralls.adoc.
| Coverage reporting could be useful for a team repository that hosts the final version but it is not that useful for your personal fork. |
Optionally, you can set up AppVeyor as a second CI see UsingAppVeyor.adoc.
| Having both Travis and AppVeyor ensures your App works on both Unix-based platforms and Windows-based platforms (Travis is Unix-based and AppVeyor is Windows-based) |
2.4.4. Getting started with coding
When you are ready to start coding,
-
Get some sense of the overall design by reading Section 3.1, “Architecture”.
-
Take a look at Appendix A, Suggested Programming Tasks to Get Started.
3. Design
The following section provides information about the software architecture of ContactSails. It also illustrates the design of each component.
3.1. Architecture
The Architecture Diagram given below (Figure 4) explains the high-level design of the App.

The .pptx files used to create diagrams in this document can be found in the diagrams folder. To update a diagram, modify the diagram in the pptx file, select the objects of the diagram, and choose Save as picture.
|
Given below is a quick overview of each item in the Architecture Diagram.
Main has only one class called MainApp.
It does the following:
-
At app launch: It is responsible for initializing the components in the correct sequence, and connecting them up with each other.
-
At shut down: It is responsible for shutting down the components and invoking cleanup method where necessary.
Commons represents a collection of classes used by multiple other components.
Two of those classes, EventsCenter and LogsCenter, play important roles at the architecture level.
Given below is a description of what each of those classes do:
-
EventsCenter: This class (written using Google’s Event Bus library) is used by components to communicate with other components using events (i.e. a form of Event Driven design). -
LogsCenter: This class is used by many classes to write log messages to the App’s log file.
The rest of the App consists of four components:
Each of the four components does the following:
-
Defines its API in an
interfacewith the same name as the Component. -
Exposes its functionality using a
{Component Name}Managerclass.
For example, the Logic component (see Figure 5 below) defines it’s API in the Logic.java interface and exposes its functionality using the LogicManager.java class.
Events-Driven nature of the design
The Sequence Diagram (Figure 6) below shows how the components interact for the scenario where the user issues the command delete 1.
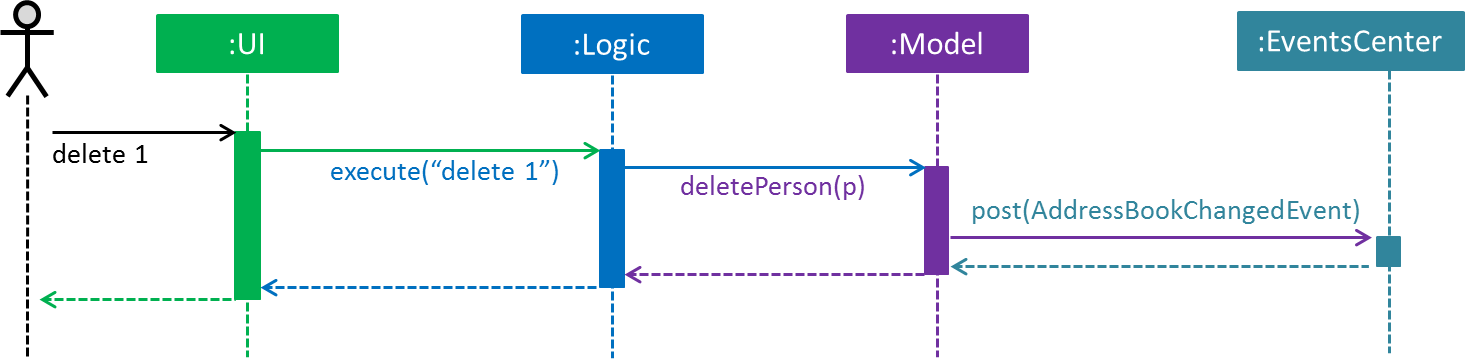
delete 1 command (part 1)
Note how the Model simply raises a AddressBookChangedEvent when the Address Book data are changed, instead of asking the Storage to save the updates to the hard disk.
|
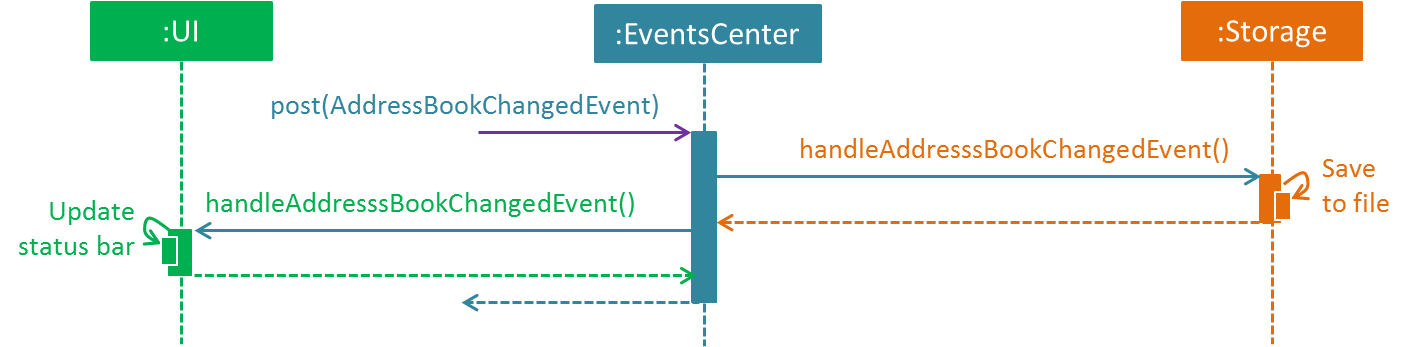
The Sequence Diagram (Figure 7) below shows how EventsCenter reacts to that event, which eventually results in the updates being saved to the hard disk and the status bar of the UI being updated to reflect the 'Last Updated' time.
delete 1 command (part 2)
Note how the event is propagated through the EventsCenter to the Storage and UI without Model having to be coupled to either of them. This is an example of how this Event Driven approach helps us reduce direct coupling between components.
|
The sections from 3.2 to 3.5 below give more details of each component.
3.2. UI Component
The UI Component consists of a MainWindow that is made up of parts e.g.CommandBox, ResultDisplay, PersonListPanel, StatusBarFooter, BrowserPanel etc. All these, including the MainWindow, inherit from the abstract UiPart class.
Figure 8 below shows the structure of the UI component.
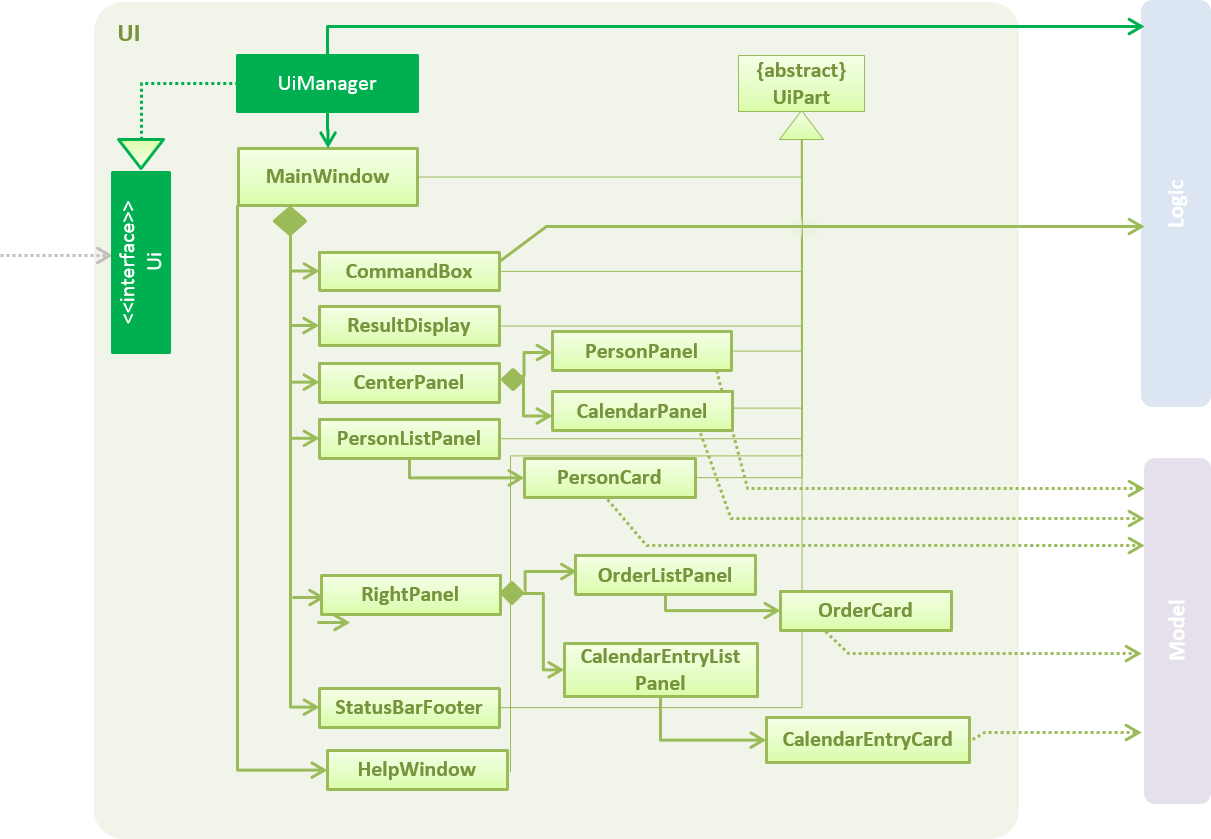
API for the UI Component: Ui.java
The UI Component uses JavaFx UI framework. The layout of these UI parts are defined in matching .fxml files that are in the src/main/resources/view folder. For example, the layout of the MainWindow is specified in MainWindow.fxml
The UI Component does the following:
-
Executes user commands using the
Logiccomponent. -
Binds itself to some data in the
Modelso that the UI can auto-update when data in theModelchange. -
Responds to events raised from various parts of the App and updates the UI accordingly.
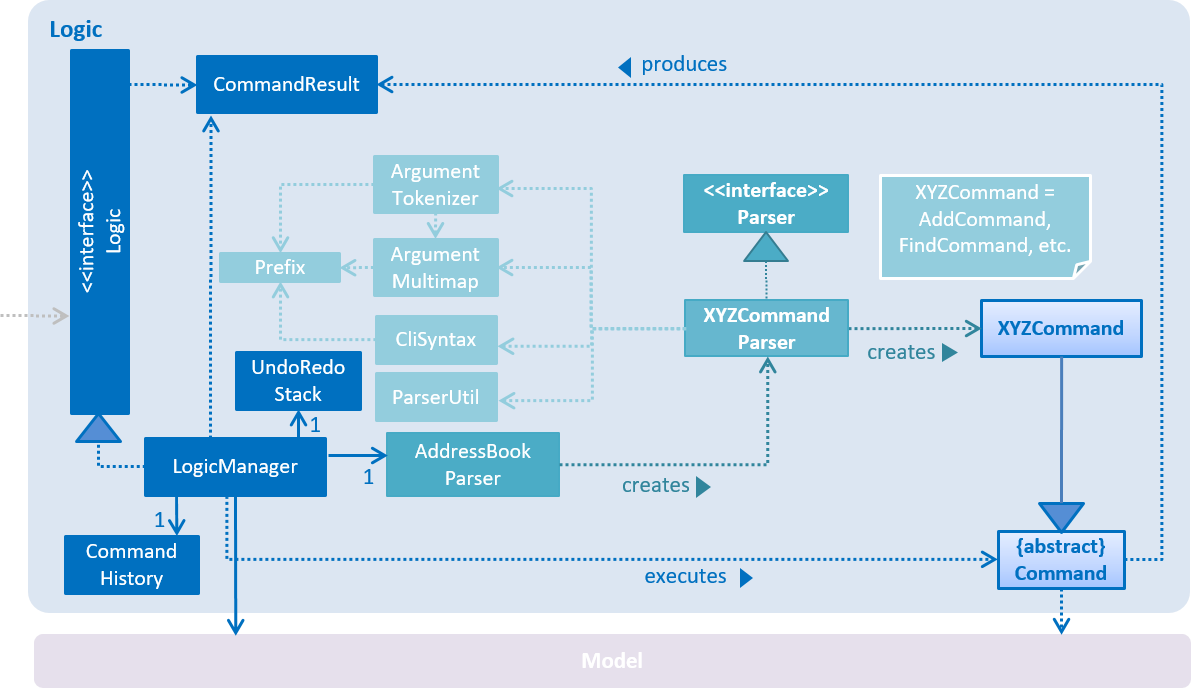
3.3. Logic Component
The Logic Component deals with how each command would be parsed and executed in an event-driven design.
Figure 9 below shows the structure of the Logic Component.
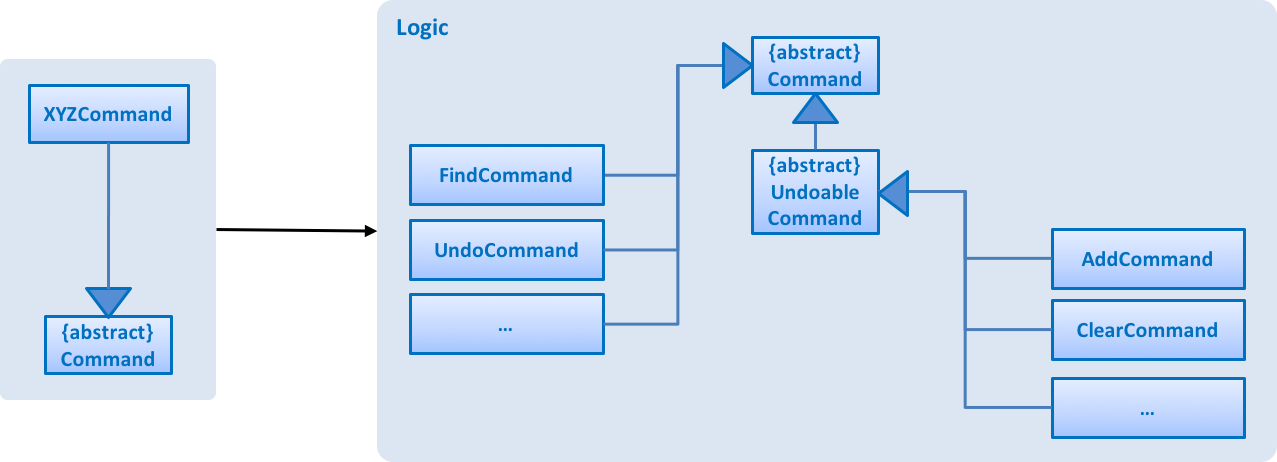
This diagram above (Figure 10) shows the finer details concerning XYZCommand and Command in Figure 9, “Structure of the Logic Component”
API for the Logic Component:
Logic.java
The Logic Component does the following:
-
Logicuses theAddressBookParserclass to parse the user command. -
This results in a
Commandobject which is executed by theLogicManager. -
The command execution can affect the
Model(e.g. adding a person) and/or raise events. -
The result of the command execution is encapsulated as a
CommandResultobject which is passed back to theUi.
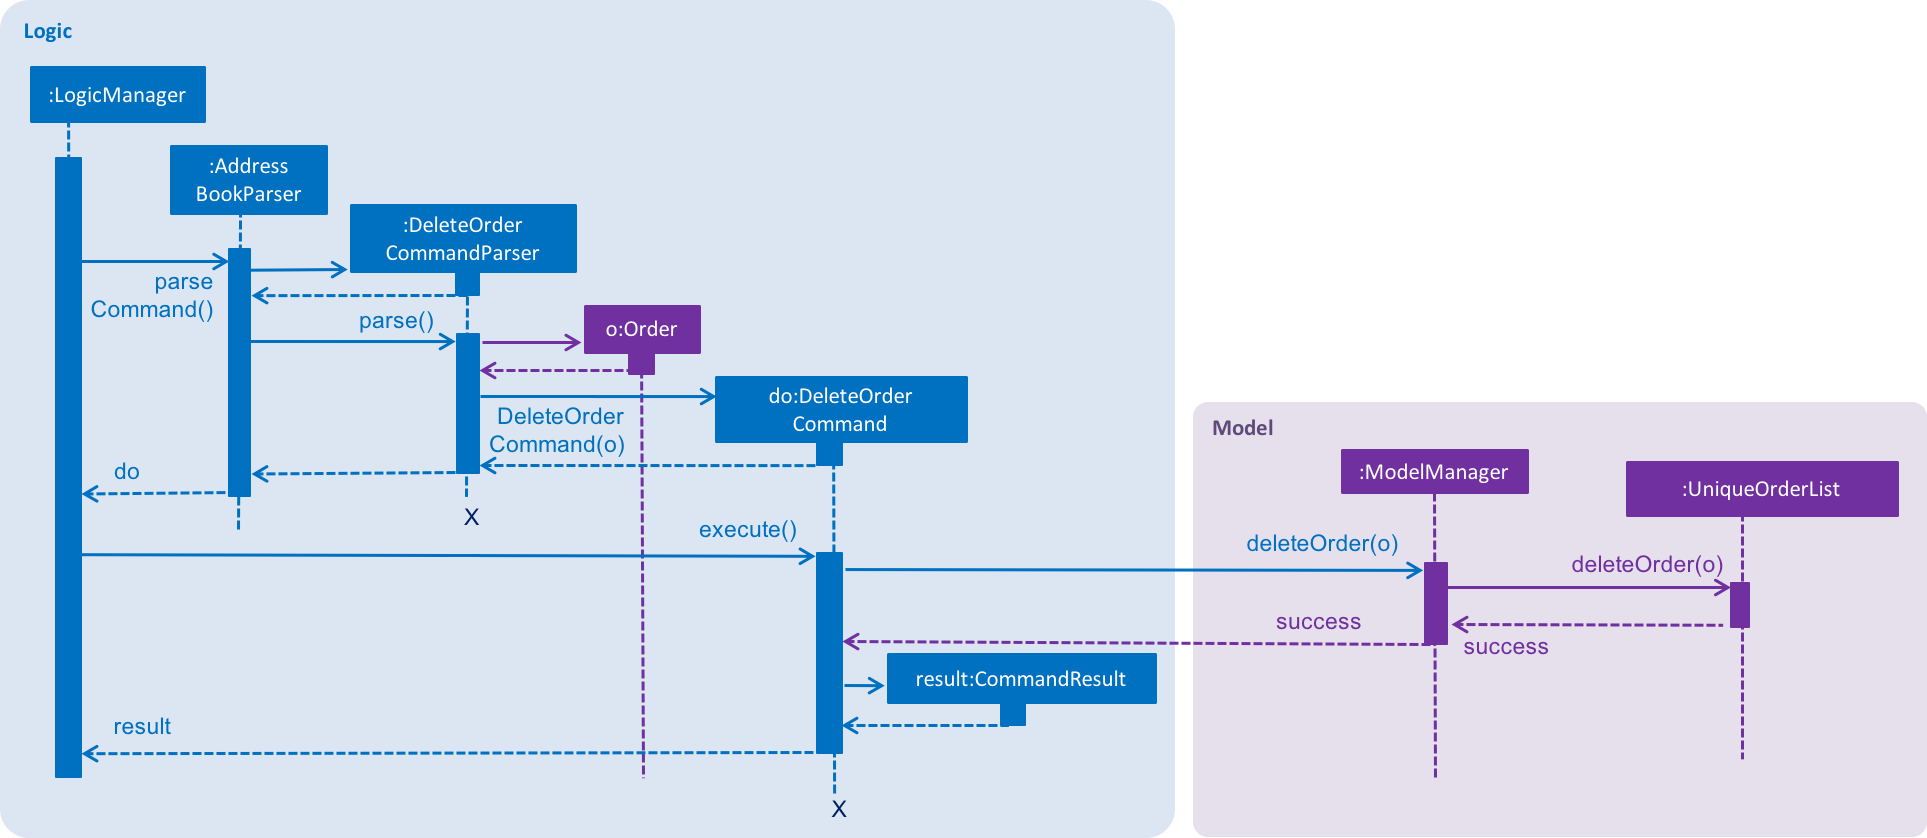
Given below is the Sequence Diagram (Figure 11) for interactions within the Logic component for the execute("delete 1") API call.
delete 1 Command3.4. Model Component
The Model Component handles the contacts, orders, and events in ContactSails and all their stored details in data structures.
These structures also provide APIs to create, read, update and delete the details of these objects.
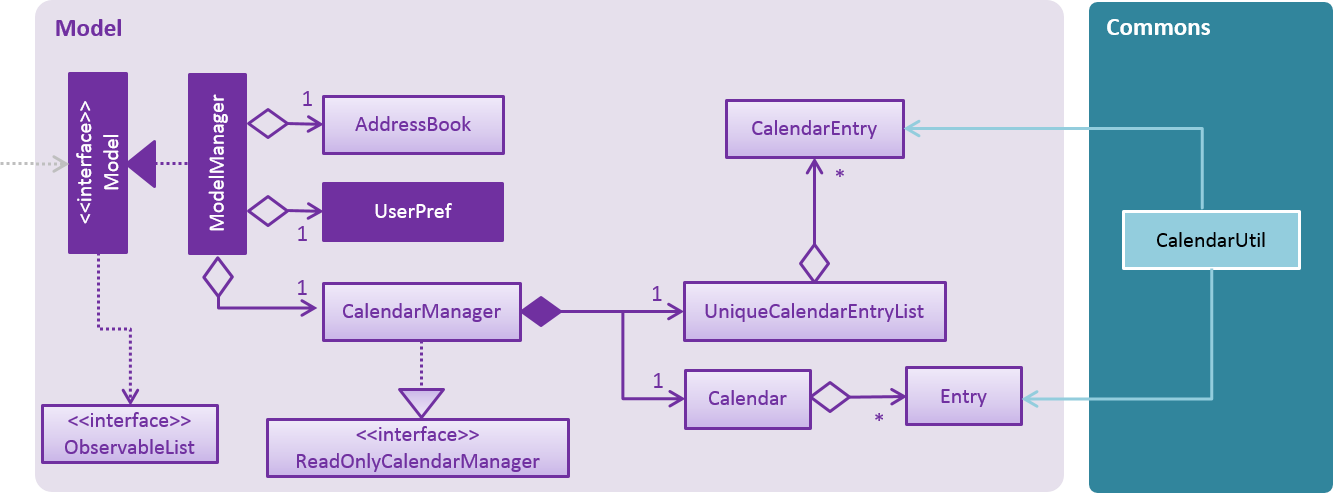
Figure 12 below shows the structure of the Model Component.
Model ComponentAPI for the Model Component: Model.java
The Model Component does the following:
-
Stores a
UserPrefobject that represents the user’s preferences. -
Stores the Address Book data.
-
Exposes an unmodifiable
ObservableList<Person>that can be 'observed' e.g. the UI can be bound to this list so that the UI automatically updates when the data in the list change. -
Exposes an unmodifiable
ObservableList<Order>andObservableList<CalendarEntry>similar to theObservableList<Person>mentioned above.
3.5. Storage Component
The Storage Component handles the storing of data in the address book on the local computer.
Figure 13 below shows the structure of the Storage Component.
API for the Storage Component: Storage.java
The Storage Component does the following:
-
Saves
UserPrefobjects in .json format and reads it back. -
Saves the Address Book data in .xml format and reads it back.
3.6. Common classes
Classes used by multiple components are in the seedu.addressbook.commons package.
4. Implementation
This section describes some noteworthy details on how certain features are implemented.
4.1. Undo/Redo feature
This feature allows users to undo and redo certain commands executed in the current session.
4.1.1. Current implementation
The undo/redo mechanism is facilitated by an UndoRedoStack, which resides inside LogicManager. It supports undoing and redoing of commands that modifies the state of the address book (e.g. add, edit). Such commands will inherit from UndoableCommand.
UndoRedoStack only deals with UndoableCommands. Commands that cannot be undone will inherit from Command instead.
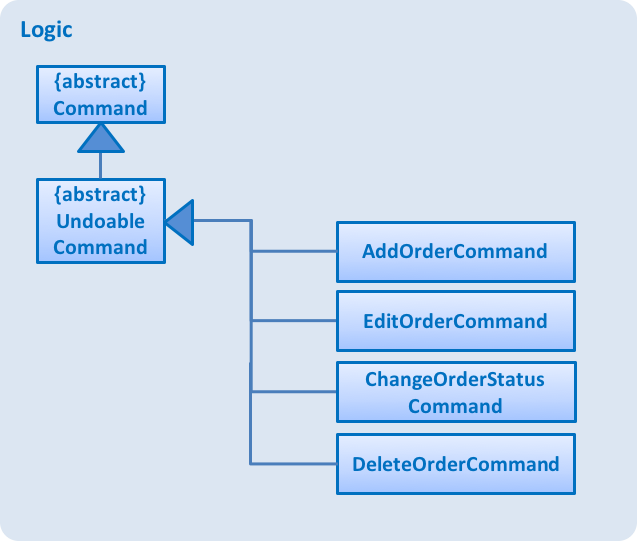
Figure 14 shows the inheritance diagram for commands.
Logic ComponentAs you can see from figure 14, UndoableCommand adds an extra layer between the abstract Command class and concrete commands that can be undone, such as the DeleteCommand. Note that extra tasks need to be done when executing a command in an undoable way, such as saving the state of the address book before execution. UndoableCommand contains the high-level algorithm for those extra tasks while the child classes implements the details of how to execute the specific command. Note that this technique of putting the high-level algorithm in the parent class and lower-level steps of the algorithm in child classes is also known as the template pattern.
Commands that are not undoable have similar implementations like the code snippet below:
public class ListCommand extends Command {
    @Override
    public CommandResult execute() {
        // ... list logic ...
    }
}
With the extra layer, the commands that are undoable are implemented similarly to the code snippet below:
public abstract class UndoableCommand extends Command {
    @Override
    public CommandResult execute() {
        // ... undo logic ...

        executeUndoableCommand();
    }
}

public class DeleteCommand extends UndoableCommand {
    @Override
    public CommandResult executeUndoableCommand() {
        // ... delete logic ...
    }
}
Suppose that the user has just launched the application. The UndoRedoStack will be empty at the beginning.
The user executes a new UndoableCommand, delete 5, to delete the 5th person in AddressBook residing in Model.
The current state of the ContactSails is saved before the delete 5 command executes.
Figure 15 below shows the state of UndoRedoStack before and after the execution of delete 5 command.

In Figure 15, when delete 5 command finishes execution, the command will be pushed onto the undoStack (the state before the execution is saved together with the command).
As the user continues to use the program, more commands are added into the undoStack.
For example, the user may execute add n/David … to add a new person.
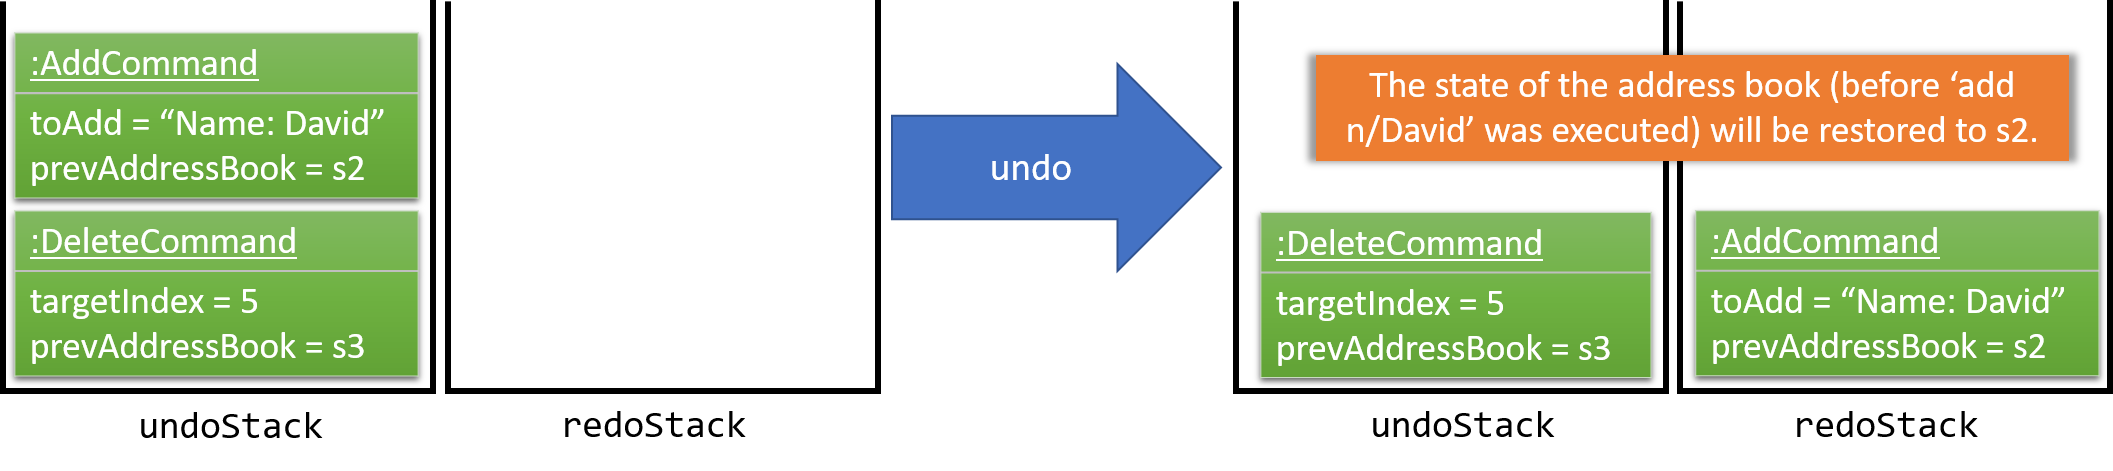
Figure 16 below shows the change in undoStack when add command is executed right after delete 5 command.
In Figure 16, undoStack initially contains delete 5 command alongside the state of Model before delete 5 was executed.
Upon executing add command, add command and the state of ContactSails before execution of add command is added to the undoStack.
If a command fails its execution, it will not be pushed to the UndoRedoStack at all.
|
The user now decides that adding the person was a mistake, and decides to undo that action using undo.
We will pop the most recent command out of the undoStack and push it back to the redoStack.
We will restore Model to the state before the add command executed.
Figure 17 below shows the change in UndoRedoStack when the undo is performed.
In Figure 17, undo results in add command in the undoStack being popped out and pushed into redoStack.
At the same time, the state of Model before the execution of add command is restored.
If the undoStack is empty, then there are no other commands left to be undone, and an Exception will be thrown when popping the undoStack.
|
The sequence diagram in Figure 18 shows how the undo operation works:
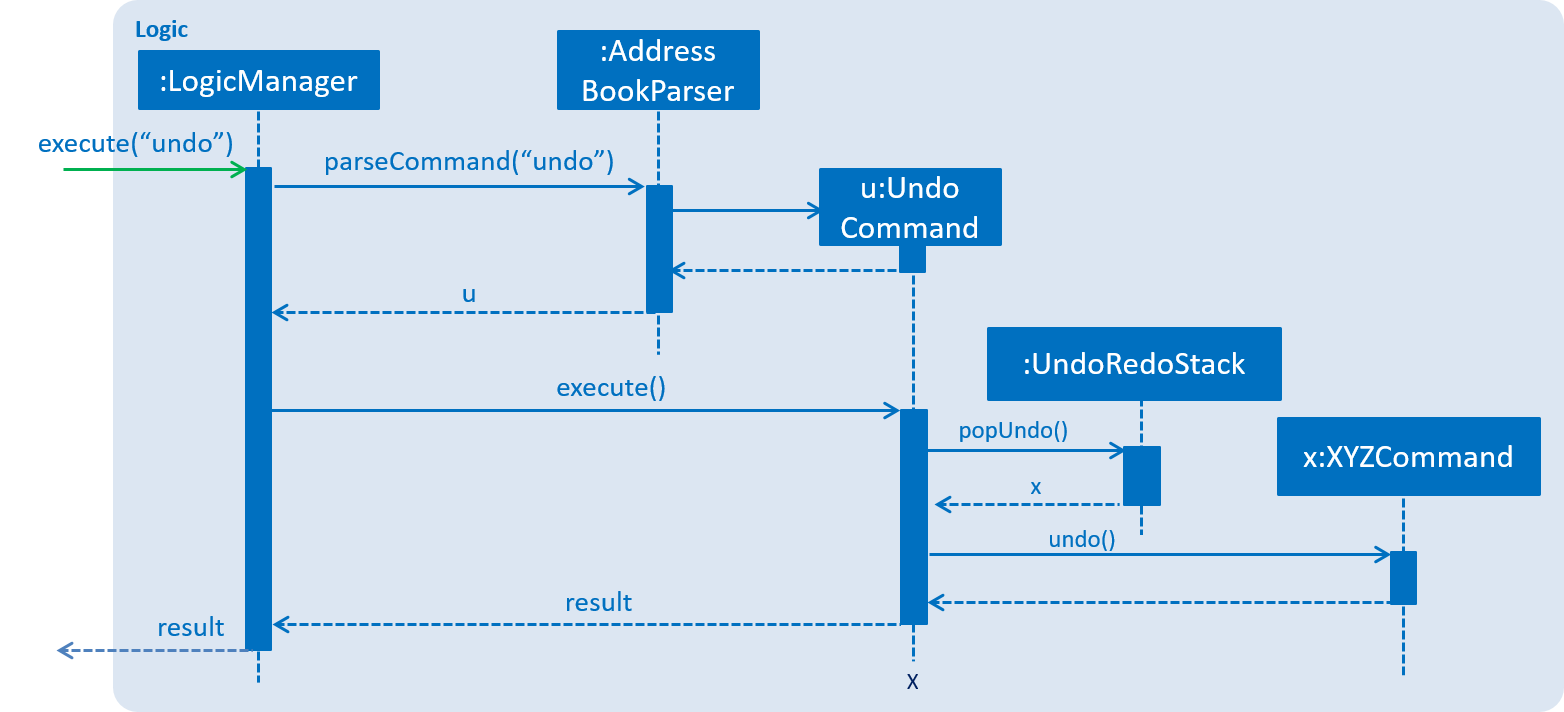
In Figure 18, when the user enters the command to undo, AddressBookParser will parse the given command and create an UndoCommand to be returned to LogicManager.
LogicManager will call execute() method in UndoCommand, which in turn calls popUndo() method in UndoRedoStack.
UndoRedoStack will return the most recently executed UndoableCommand popped from the undoStack within UndoRedoStack.
UndoCommand will then call undo() on the XYZCommand, which restores the initial state of Model before XYZCommand was executed.
The redo does the exact opposite (pops from redoStack, push to undoStack, and restores the address book to the state after the command is executed).
If the redoStack is empty, then there are no other commands left to be redone, and an Exception will be thrown when popping the redoStack.
|
Suppose the user now decides to execute a new command, clear.
Figure 19 below shows the change in UndoRedoStack after executing clear command.

In Figure 19, clear will be pushed into the undoStack. This time the redoStack is no longer empty.
Its contents are cleared as it no longer make sense to redo the add n/David command (this is the behavior that most modern desktop applications follow).
Commands that are not undoable are not added into the undoStack.
For example, list, which inherits from Command rather than UndoableCommand, will not be added after execution as seen in Figure 20 below.

In Figure 20, undoStack remained the same even after list command is executed since only commands inherited from UndoableCommand will be pushed to undoStack.
The following activity diagram in Figure 21 summarize what happens inside the UndoRedoStack when a user executes a new command:
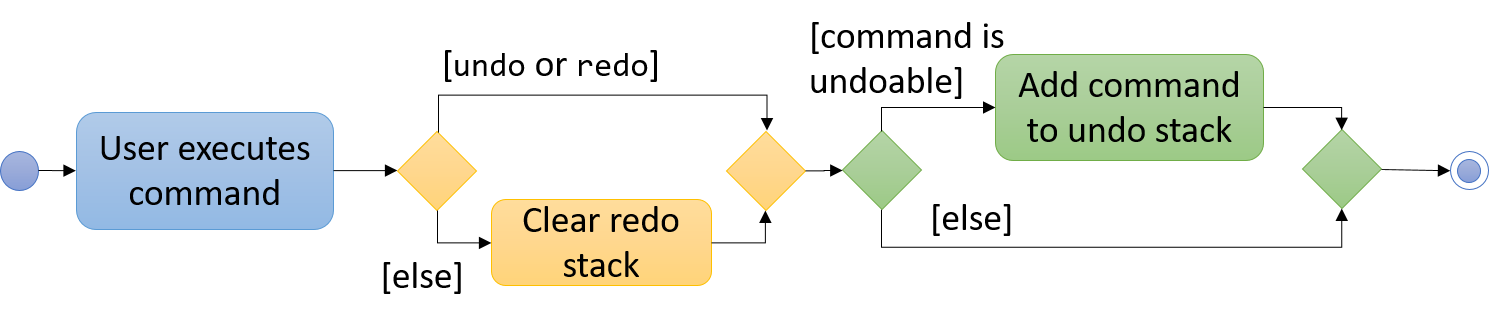
Command is executedIn Figure 21, after execution, any Command that is not UndoCommand nor RedoCommand will cause redoStack to be cleared.
Afterwards, if the Command is an UndoableCommand, it will be pushed to undoStack before control is returned to the user eventually.
4.1.2. Design considerations
Aspect: Implementation of UndoableCommand
-
Alternative 1 (current choice): Add a new abstract method
executeUndoableCommand()-
Pros: We will not lose any undone/redone functionality as it is now part of the default behaviour. Classes that deal with
Commanddo not have to know thatexecuteUndoableCommand()exist. -
Cons: It is hard for new developers to understand the template pattern used to design this implementation.
-
-
Alternative 2: Simply override
execute()-
Pros: The overriding does not involve the template pattern, which is easier for new developers to understand.
-
Cons: Classes that inherit from
UndoableCommandmust remember to callsuper.execute(), or lose the ability to undo/redo.
-
Aspect: How undo & redo executes
-
Alternative 1 (current choice): Saves the entire
Modelin terms of savingAddressBookandCalendarManager.-
Pros: This method is easy to implement.
-
Cons: This may cause performance issues in terms of memory usage.
-
-
Alternative 2: Individual command knows how to undo/redo by itself.
-
Pros: This will use less memory (e.g. for
delete, just save the person being deleted). -
Cons: We must ensure that the implementation of each individual command are correct.
-
Aspect: Type of commands that can be undone/redone
-
Alternative 1 (current choice): Only include commands that modifies the application (
add,clear,edit).-
Pros: We only revert changes that are hard to change back (the view can easily be re-modified as no data are lost).
-
Cons: User might think that undo also applies when the list is modified (undoing filtering for example), only to realize that it does not do that, after executing
undo.
-
-
Alternative 2: Include all commands.
-
Pros: The inclusion of all commands might be more intuitive for the user.
-
Cons: User have no way of skipping such commands if he or she just want to reset the state of the application and not the view. Additional Info: See our discussion here.
-
Aspect: Data structure to support the undo/redo commands
-
Alternative 1 (current choice): Use separate stack for undo and redo
-
Pros: A separate stack for undo and redo is easier for new Computer Science student undergraduates to understand, who are likely to be the new incoming developers of our project.
-
Cons: Logic is duplicated twice. For example, when a new command is executed, we must remember to update both
HistoryManagerandUndoRedoStack.
-
-
Alternative 2: Use
HistoryManagerfor undo/redo-
Pros: We do not need to maintain a separate stack, and just reuse what is already in the codebase.
-
Cons: This requires dealing with commands that have already been undone, in which we must remember to skip these commands. This violates Single Responsibility Principle and Separation of Concerns as
HistoryManagernow needs to do two different things.
-
4.2. Person Panel
The PersonPanel replaces the previous BrowserPanel, and is called upon using the methods in CenterPanel.
PersonPanel will be used to display contact’s information, groups and preferences depending on user’s actions.
4.2.1. Layout Implementation
The specifications for the layout of PersonPanel is in PersonPanel.fxml. Figure 22 shows the visual layout of the PersonPanel.
Notably, the contact’s group and preferences are coloured as these are important information to the user. We plan to implement more features for v2.0, such as a profile picture for the contact.
4.2.2. Current Implementation
By utilising the EventsCenter, PersonPanel is able to display contact’s particulars, its
groups and preferences when its respective PersonCard is selected.
The following 2 code snippets will show its implementation.
Code Snippet 1 : handlePersonPanelSelectionChangedEvent(PersonPanelSelectionChangedEvent event)
public void handlePersonPanelSelectionChangedEvent(PersonPanelSelectionChangedEvent event) {
    loadBlankPersonPage();
    logger.info(LogsCenter.getEventHandlingLogMessage(event));
    selectedPersonCard = event.getNewSelection();
    person = selectedPersonCard.person;
    loadPersonPage(person);
}
Whenever a contact is selected, the event handlePersonPanelSelectionChangedEvent is triggered. Once the event is triggered,
the method will obtain its respective PersonCard variable and a Person variable, which
contains the information of the contact. The person variable will be passed
into the method loadPersonPage(Person person), which is code snippet 2.
Code Snippet 2: loadPersonPage(Person person)
private void loadPersonPage(Person person) {
    name.setText(person.getName().fullName);
    phone.setText(person.getPhone().toString());
    address.setText(person.getAddress().toString());
    email.setText(person.getEmail().toString());
    person.getGroupTags().forEach(tag -> {
        Label tagLabel = new Label(tag.tagName);
        tagLabel.getStyleClass().add(PersonCard.getGroupTagColorStyleFor(tag.tagName));
        groups.getChildren().add(tagLabel);
    });
    person.getPreferenceTags().forEach(tag -> {
        Label tagLabel = new Label(tag.tagName);
        tagLabel.getStyleClass().add(PersonCard.getPrefTagColorStyleFor(tag.tagName));
        preferences.getChildren().add(tagLabel);
    });
    setIcons();
    setImageSizeForAllImages();
}
The Person variable that is passed into loadPersonPage will be used to extract the
contact’s information for display. After which, the UI of the PersonPanel will be updated
accordingly to reflect the changes.
| No contact information will be displayed upon opening the application as no contact is selected. |
To better illustrate the code snippets, the following is a high level sequence diagram when the user
selects a contact found in PersonListPanel.
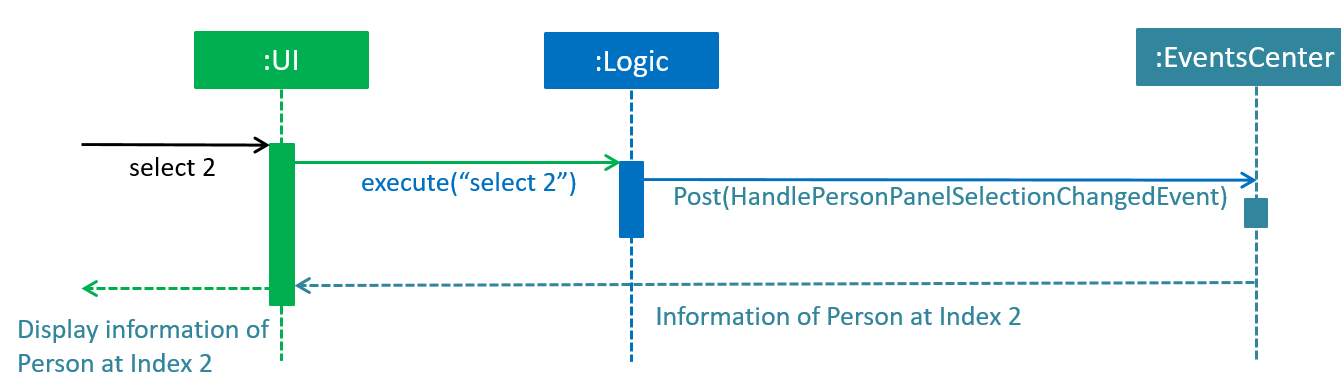
When a contact is selected using a mouse or a command in PersonListPanel, this will result in EventsCenter
returning a Person of the selected contact, which then displays the contact information in PersonPanel.
4.2.3. Design Considerations
Aspect: Display of tags in PersonPanel (and PersonCard)
-
Alternative 1 (current choice): Tags are coloured randomly.
-
Pros: It is easier to differentiate between tags through the colours.
-
Cons: It may be confusing as tag colours will be changed for each new instance of the application.
-
-
Alternative 2: Tags to be kept the same colour as intended.
-
Pros: There is no work to be done.
-
Cons: Users will take a longer time to differentiate the tags.
-
Aspect: Display of contact’s information
-
Alternative 1 (current choice): It is to replace BrowserPanel with a PersonPanel which displays all information of the chosen contact.
-
Pros: We can add more features into PersonPanel that the BrowserPanel is unable to achieve.
-
Cons: PersonPanel will not be able to display web pages, for instance the contact’s social media web page.
-
-
Alternative 2: It is to keep the BrowserPanel and use HTML files to display contact’s information.
-
Pros: There isn’t a need to modify the existing code but to edit the HTML files to display contact’s information.
-
Cons: It may take a long time to implement and there are other important issues.
-
4.3. Order Management
Orders refer to the sales orders that are added by the salesperson to ContactSails.
These orders can be added to any particular person of the address book.
After being added, orders can be edited and deleted. Additionally, orders can be marked as ongoing and done.
4.3.1. Current Implementation
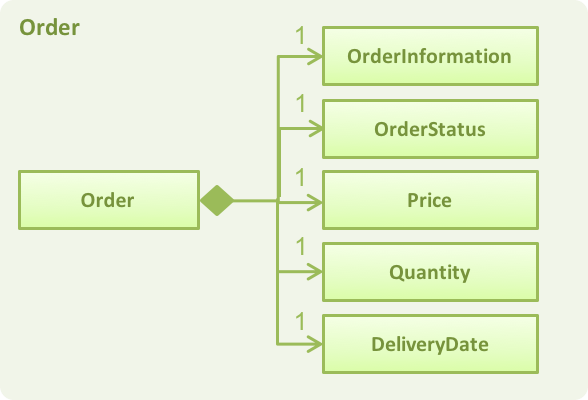
An Order is represented in the application as shown in the figure given below.
It contains the OrderInformation, OrderStatus, Price, Quantity, and DeliveryDate fields.
Order objects are kept in-memory during an application session with the help of a UniqueOrderList object, whose UML diagram is given below.
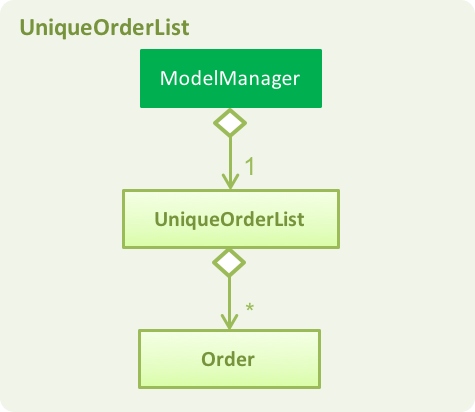
The UniqueOrderList object ensures that ContactSails does not have any duplicate Order objects. This object is stored in the ModelManager.
The ModelManager utilises the UniqueOrderList object for order management related operations.
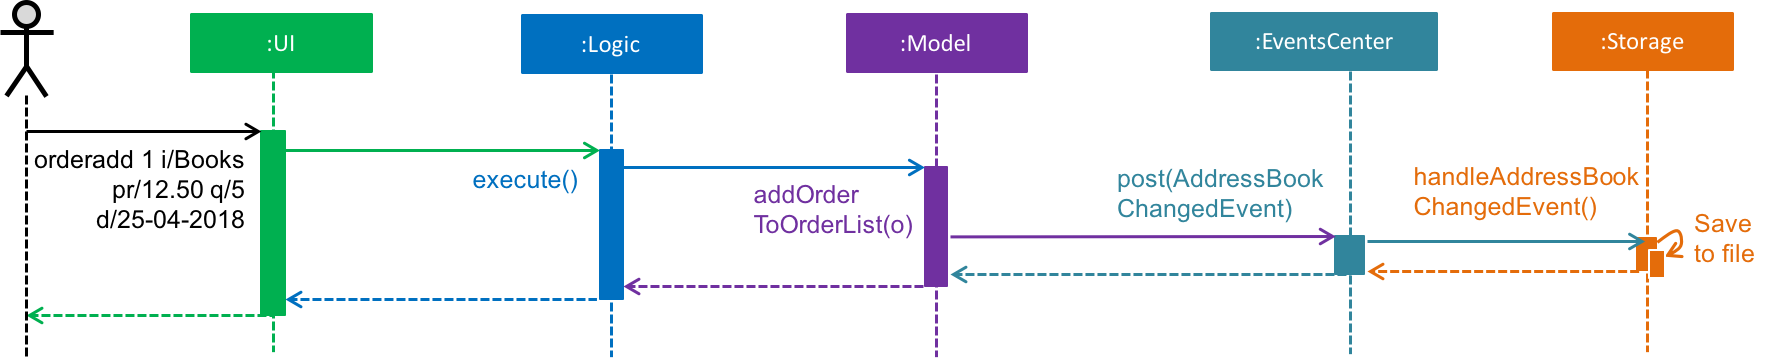
An example operation would be adding an order to ContactSails.
Given below is a high-level sequence diagram for this operation.
Operations on orders can be done using the AddOrderCommand, EditOrderCommand, ChangeOrderStatusCommand, and DeleteOrderCommand commands.
The class diagram given below shows how these commands are part of the Logic Component.
Logic component.These commands are described in more detail in the sections below.
Adding Orders
The AddOrderCommand adds an order to list of orders in ContactSails.
The figure below shows the sequence diagram for adding an order.
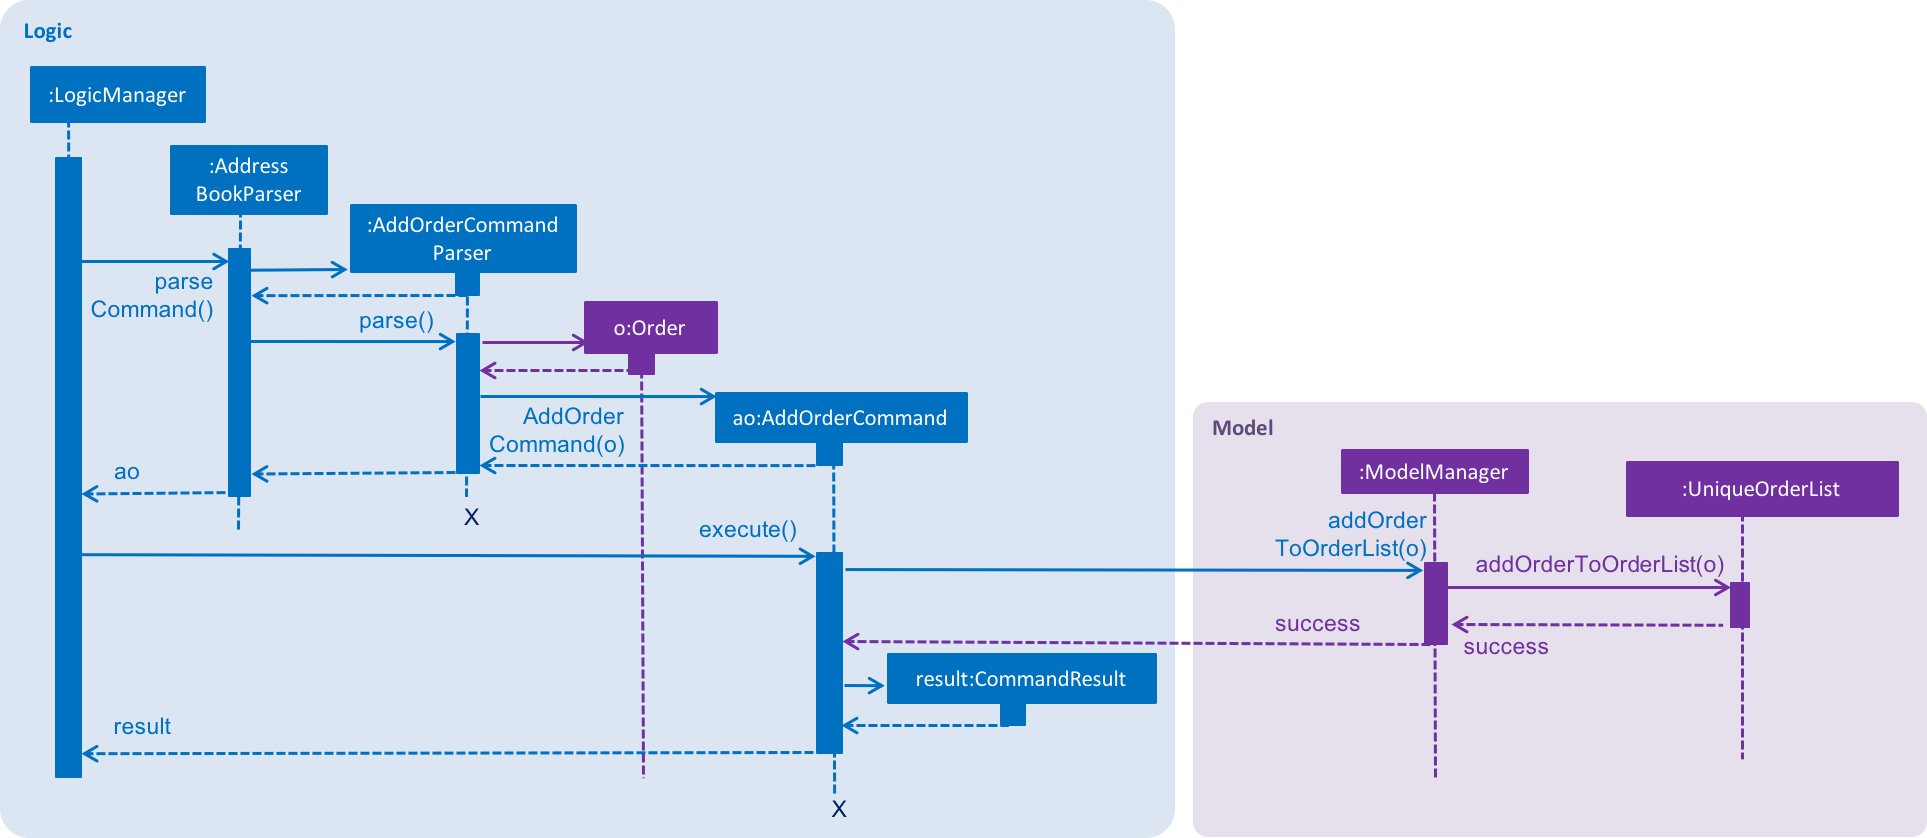
AddOrderCommand.The following snippet shows how the AddOrderCommand#executeUndoableCommand() method updates the model of the
application by adding orderToAdd to the list of orders in the application. Note that orderToAdd will
not be added if a duplicate order has already been added to the list of orders before.
public class AddOrderCommand extends UndoableCommand {
    public CommandResult executeUndoableCommand() throws CommandException {
        requireNonNull(model);
        try {
            model.addOrderToOrderList(orderToAdd);
        } catch (DuplicateOrderException e) {
            throw new CommandException(MESSAGE_ORDER_NOT_ADDED);
        }

        // ... display updated address book ...
    }
}
The order added will be displayed in the OrderListPanel in ContactSails.
Editing Orders
The EditOrderCommand edits the targetOrder with the provided information which is specified by its index
in the last shown listing of orders. The order will be updated with the new values given by the user.
The figure below shows the sequence diagram for editing an order.
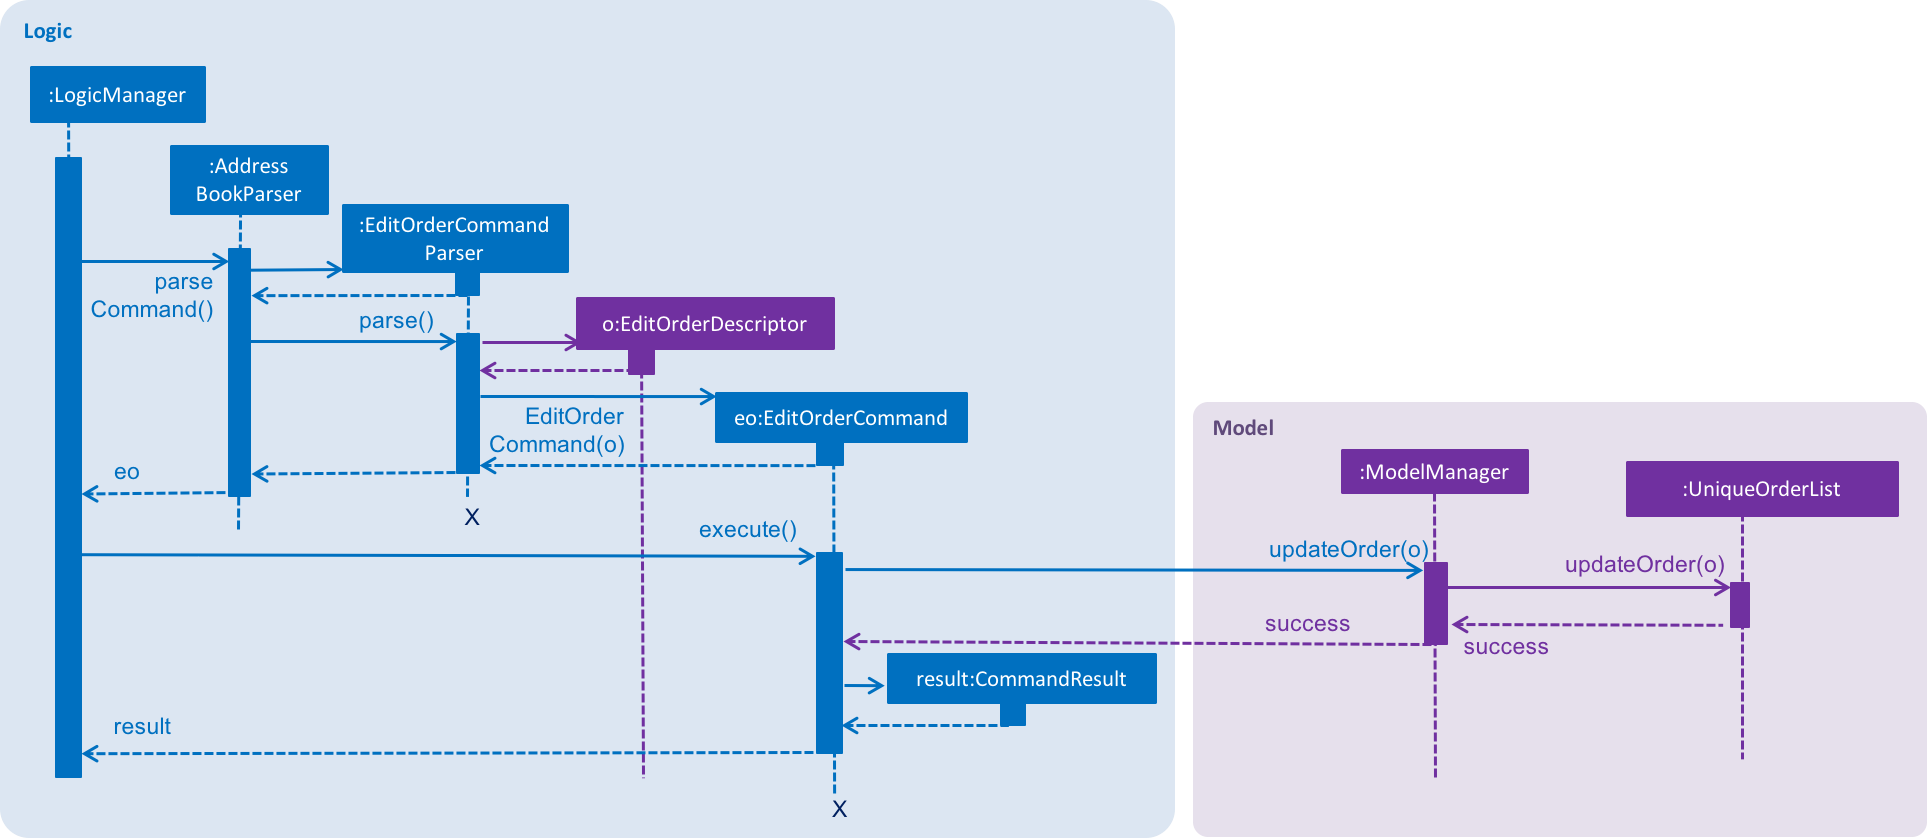
EditOrderCommand.In the EditOrderCommand class, a new class called EditOrderDescriptor is defined to create objects
that will store the new values of the fields that need to be edited in the original order.
The createEditedOrder() method uses the editOrderDescriptor object to create the editedOrder
object.
The executeUndoableCommand() method uses this editedOrder object to update the model of the application.
The new order is now stored in ContactSails in the place of the old order.
Changing OrderStatus
The ChangeOrderStatusCommand changes the OrderStatus field of an Order object to either ongoing or done.
The order object is obtained by using its index in the last shown listing of orders.
The figure below shows the sequence diagram for changing an order’s status.
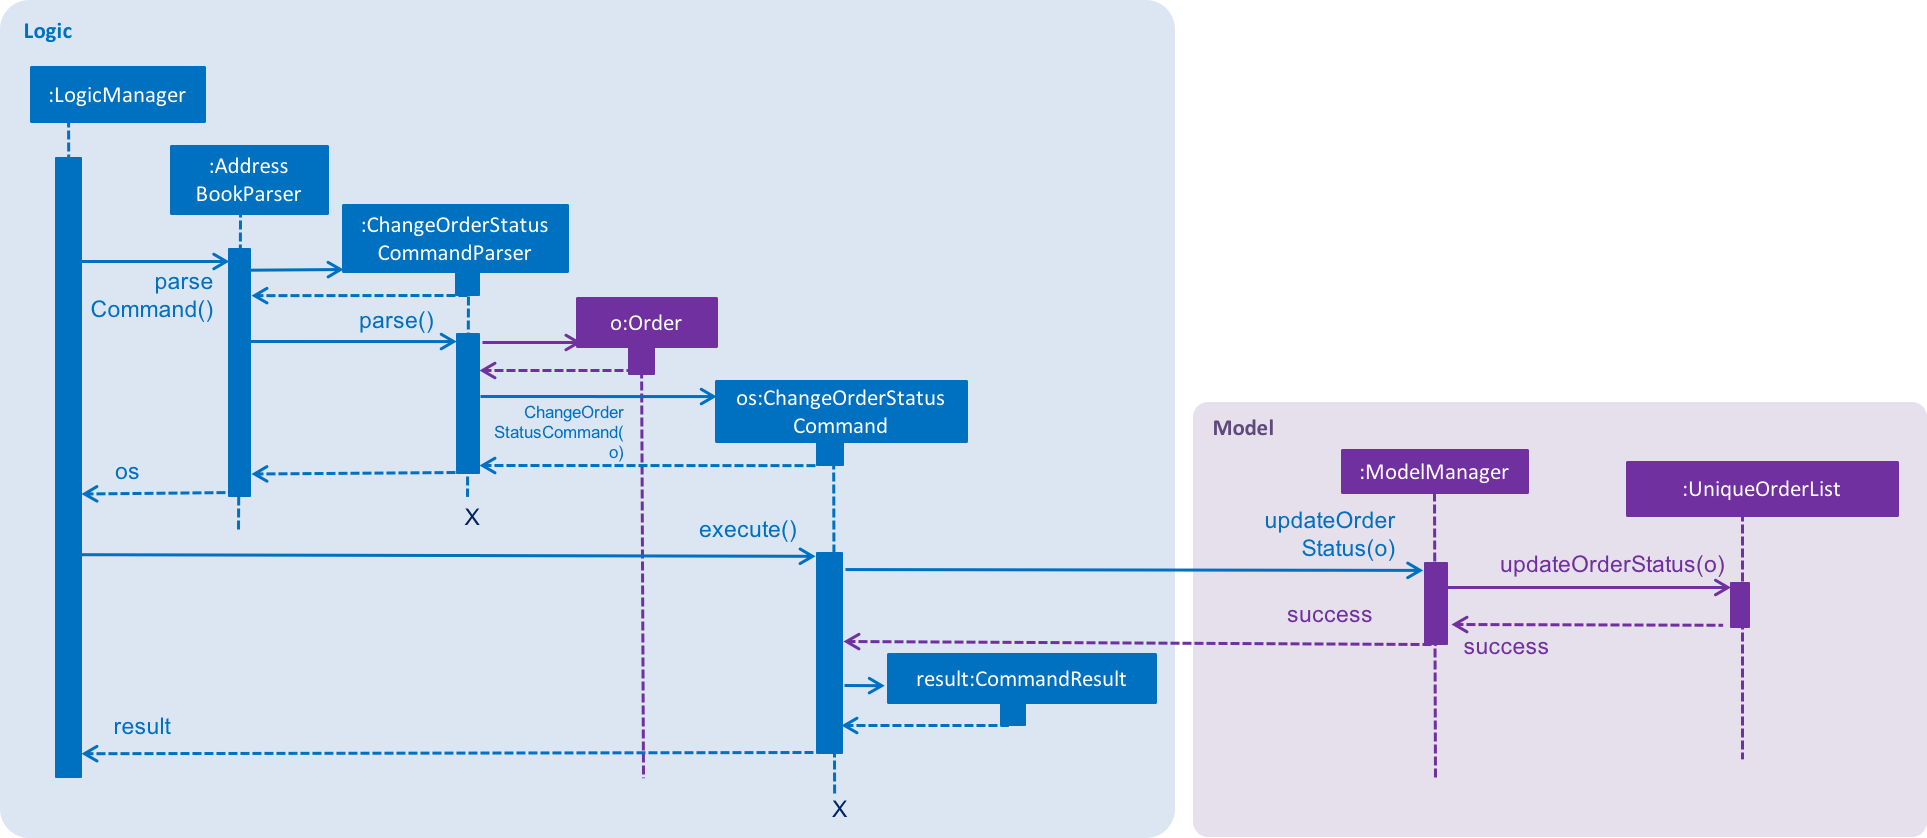
ChangeOrderStatusCommand.On changing the order status of an order, the colour of the corresponding OrderCard in the OrderListPanel also changes.
This is done by simply removing the existing CSS styles associated with the OrderCard
and re-adding a new stylesheet with the appropriate colours to that OrderCard.
Deleting Orders
The DeleteOrderCommand deletes the order specified by its index in the last shown listing of orders.
The figure below shows the sequence diagram for changing an order’s status.
DeleteOrderCommand.The above method deletes orderToDelete from the model of the address book and the resulting list of orders is displayed.
Storing Orders
Storing orders in the application data file is very similar to that of storing persons.
The XmlAdaptedOrder class is used to convert the Order objects in the model to JAXB-friendly XmlAdaptedOrder objects
that can be stored in the .xml data file. When the application starts up, this class is also used to convert the XmlAdaptedOrder objects
into a model-friendly Order objects.
Displaying Orders In GUI
A single Order is displayed using an OrderListCard. The list of all orders in the address book is then displayed in a list
using the OrderListPanel, which contains an OrderListView of multiple OrderListCards.
4.3.2. Design Considerations
Aspect: Data structures to support order operations
-
Alternative 1 (current choice): Store a UniqueOrderList of orders containing orders of all persons in the application.
-
Pros: Easier to implement. Additionally, all order management operations will be synchronised.
-
Cons: Higher memory usage might affect the performance of the application.
-
-
Alternative 2: Using an association class to store multiple references to the same order.
-
Pros: Duplicate orders (with the same information except the person associated with it) will just be stored as a single order in memory. If multiple persons have the same order, there will be multiple references to one Order object. This reduces memory usage.
-
Cons: Harder to implement as updating or deleting orders for one person must not affect orders of another person having the same order.
-
4.4. Changing Themes
The theme of ContactSails can be changed using the ChangeThemeCommand.
Currently, ContactSails supports dark and light themes.
4.4.1. Current Implementation
The Theme object in the model is used to store the current theme version.
The figure below shows the hierarchy of the Theme class.

Model component with the Theme class.When the ChangeThemeCommand is executed, a ChangeThemeEvent is raised by EventsCenter.
The handleChangeThemeEvent() method in the `MainWindow
class subscribes to this particular event and calls the handleChangeTheme() FXML controller method. This method changes the theme of the application based on the
theme version it receives as a parameter. This is done by attaching the corresponding CSS stylesheet to the MainWindow JavaFX scene of the application.
Given below is a high level sequence diagram for the ChangeThemeCommand.

ChangeThemeCommand.When the user exits the application, the current theme version will be stored in the preferences.json file as shown in the code snippet below.
{
  "guiSettings" : {
        // ... guiSettings attributes ...
    },
    "theme" : "dark"
  },
  // ... file management attributes ...
}
Storing the theme in the preferences.json enables the theme change to be persistent across different application sessions.
4.4.2. Design Considerations
Aspect: Storing theme version
-
Alternative 1 (current choice): Encapsulate the theme version in a
Themeobject.-
Pros: Relevant attributes and methods will be encapsulated in a single class.
-
Cons: Higher memory overhead.
-
-
Alternative 2: Storing the theme version as a string in guiSettings.
-
Pros: Easier to implement, and lesser memory overhead.
-
Cons: Methods related to changing themes would have to be written in multiple classes.
-
4.5. [Proposed] Data Encryption
4.5.1. Proposed Implementation
The address book will decrypt and encrypt the XML data file every time there is an update that needs to be made to the data being stored.
The secret key for encryption/decryption will be generated using the KeyGenerator class in the javax.crypto library.
The actual encryption/decryption will be done using the org.apache.xml.security library, specifically the XMLCipher class.
4.5.2. Design Considerations
Aspect: Time of encryption of XML data file
-
Alternative 1: Encrypt/decrypt the whole file each time there is an update to what information needs to stored.
-
Pros: A new secret key can be used for each encryption/decryption, which would make it more secure against tampering or outsider access.
-
Cons: Encryption of data file for every minor change can reduce the performance of the application.
-
-
Alternative 2: Encrypt/decrypt the file only after a set time interval.
-
Pros: Performance will be improved.
-
Cons: Approach might be less secure. Implementation can also be harder.
-
4.6. Logging
We are using java.util.logging package for logging. The LogsCenter class is used to manage the logging levels and logging destinations.
-
The logging level can be controlled using the
logLevelsetting in the configuration file (See Section 4.8, “Configuration”) -
The
Loggerfor a class can be obtained usingLogsCenter.getLogger(Class)which will log messages according to the specified logging level -
Currently log messages are output through:
Consoleand to a.logfile.
Logging Levels
-
SEVERE: Critical problem detected which may possibly cause the termination of the application -
WARNING: Can continue, but with caution -
INFO: Information showing the noteworthy actions by the App -
FINE: Details that is not usually noteworthy but may be useful in debugging e.g. print the actual list instead of just its size
4.7. Calendar and Entry tracking
Users can create, edit and delete entries, which can represent events such as meetings or deadlines. ContactSails has a calendar interface that displays existing entries for better visualisation of the user’s schedule.
4.7.1. Current Implementation
ContactSails uses CalendarFX’s calendar interface. The Model component manages a list of entries, and this list of entries will synchronise with
the calendar’s internal list of entries.
Calendar Entries
CalendarEntry represents an entry created by users.
A CalendarEntry is implemented in the following manner:
public class CalendarEntry {

    private final String entryTitle;
    private final StartDate startDate;
    private final EndDate endDate;
    private final StartTime startTime;
    private final EndTime endTime;


    // ... CalendarEntry attribute getters and setters ...

}
The following is a brief description of the attributes of CalendarEntry:
-
entryTitle: Represents title of entry.
-
startDate: Represents starting date of the entry in DD-MM-YYYY format.
-
endDate: Represents ending date of the entry in DD-MM-YYYY format.
-
startTime: Represents starting time of the entry in HH:MM format (24-Hour format).
-
endTime: Represents ending time of the entry in HH:MM format (24-Hour format).
Entry management is facilitated by CalendarManager residing in ModelManager.
It supports the adding, removing and editing of CalendarEntry(e.g. addCalendarEntry, deleteCalendarEntry) and maintains a UniqueCalendarEntryList to store CalendarEntry.
The following diagram shows class diagram of Model Component related to CalendarEntry.
Model and CommonsIn the Figure 34, ModelManager contains an instance of CalendarManager. ModelManager calls the functions in CalendarManager to manage CalendarEntries stored in it.
CalendarManager in turn calls methods in UniqueCalendarEntryList to add, remove or edit CalendarEntries stored in it.
CalendarManager contains an instance of Calendar belonging to CalendarFX’s library. Calendar stores Entry, as defined in CalendarFX’s library.
CalendarEntry is converted to Entry before they can be added to Calendar via CalendarEntryConversionUtil in the Commons class.
Logic Component contains the commands required to manage user’s entries, which are AddEntryCommand, DeleteEntryCommand and EditEntryCommand.
These commands inherit from UndoableCommand and are thus can be undone via the UndoCommand.
The sequence diagram below shows how adding an entry works:
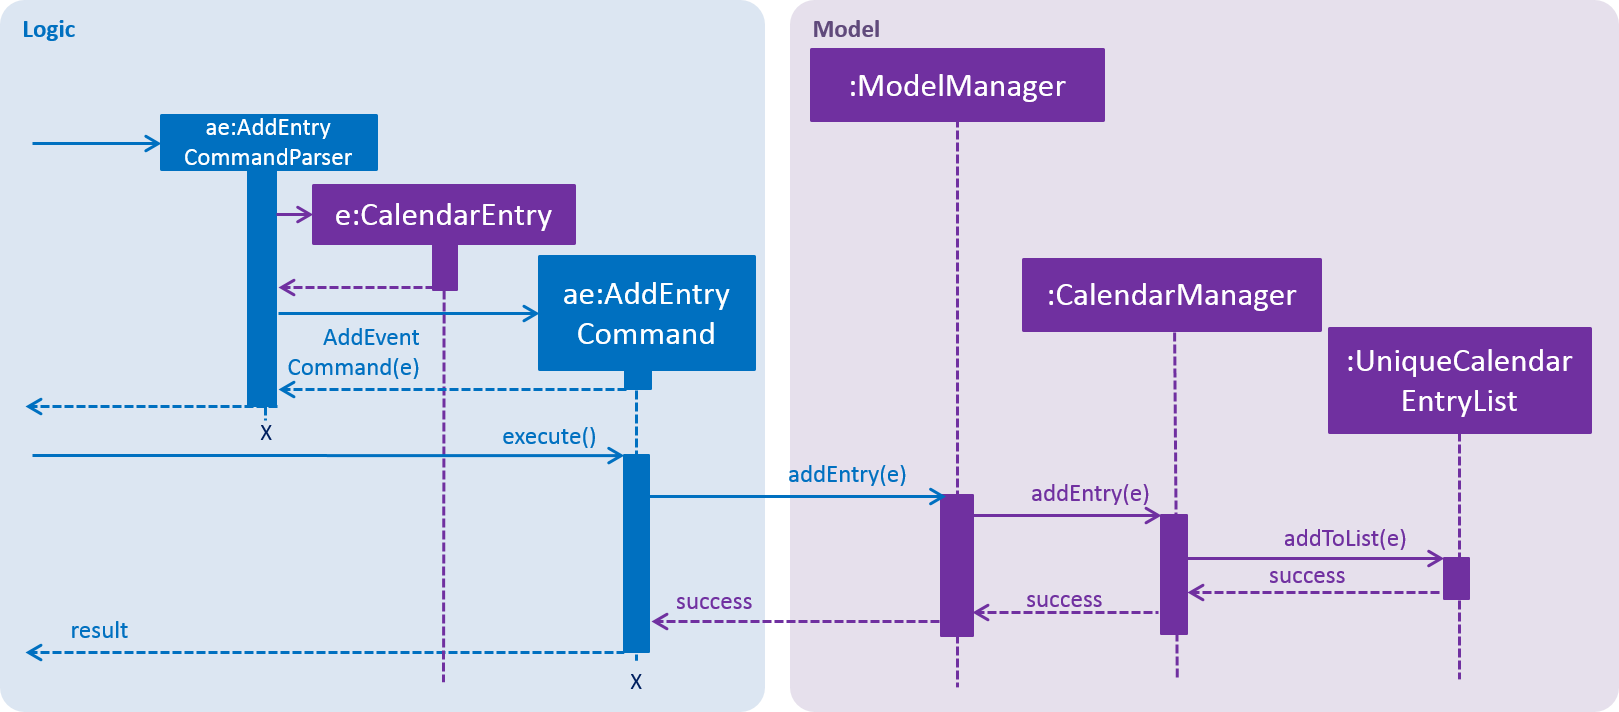
In Figure 35, when a user enters the command to add an entry, AddEntryCommandParser is invoked which creates a CalendarEntry based on user input. The parser then creates AddEntryCommand passing the CalendarEntry to it.
When AddEntryCommand is executed, CalendarEntry is passed from AddEntryCommand to ModelManager and to CalendarManager, which adds it to UniqueCalendarEntryList.
The CalendarEntry is then converted to Entry to be added to Calendar (not shown in diagram) and control is eventually returned to the user.
Storing of CalendarEntry data is managed by CalendarManagerStorage within Storage Component.
CalendarEntry is converted to XmlAdaptedCalendarEntry, which can be stored in XmlSerializableCalendarManager.
XmlSerializableCalendarManager is stored in a .xml file using XmlFileStorage.
Calendar Interface and Center Panel
CalendarView within CalendarFX’s library uses the Calendar within CalendarManager in Model to display all entries stored within Calendar.
CalendarPanel residing in Ui component creates an instance of CalendarView to manage the display of the calendar.
The following code snippet shows how CalendarPanel is initialised.
public class CalendarPanel extends UiPart<Region> {

    private static final String FXML = "CalendarPanel.fxml";

    private final Logger logger = LogsCenter.getLogger(this.getClass());

    private final CalendarView calendarView;
    private final CalendarSource calendarSource;

    @FXML
    private StackPane calendarPanelHolder;

    public CalendarPanel(Calendar calendar) {
        super(FXML);
        calendarView = CalendarFxUtil.returnModifiedCalendarView();
        calendarSource = new CalendarSource();

        initialiseCalendar(calendar);
        createTimeThread();
    }

    // Methods to initialise calendar, change display of calendar, etc.
}
When CalendarPanel is initialised, CalendarFxUtil returns an instance of CalendarView that is modified to remove unused features within CalendarView, such as the ability to print the calendar.
CalendarSource is required to store the Calendar from Model and CalendarView in turn stores CalendarSource before it can display contents of Calendar.
The setting up of CalendarSource and CalendarView is done by initialiseCalendar(calendar). createTimeThread() creates a Thread that updates the timeProperty() in CalendarView every 10 seconds,
ensuring that the current time displayed within the calendar interface matches the actual time the user is using the application.
Any changes made to Calendar in Model will automatically be shown via the CalendarView as Calendar is a class-level member in CalendarManager that is passed to CalendarPanel.
updateCalendar() in CalendarManager clears all entries within Calendar and adds CalendarEntries converted to Entries to Calendar.
As the placement of CalendarPanel coincides with that of PersonPanel at the center of the GUI interface of ContactSails, CenterPanel is used in place to switch between displaying contents of the two panels.
The following code snippet shows how CenterPanel is initialised.
public class CenterPanel extends UiPart<Region> {

    private static final String FXML = "CenterPanel.fxml";

    private CalendarPanel calendarPanel;

    private PersonPanel personPanel;

    @FXML
    private StackPane centerPlaceholder;

    public CenterPanel(Calendar calendar) {
        super(FXML);

        personPanel = new PersonPanel();
        calendarPanel = new CalendarPanel(calendar);

        displayPersonPanel();
        registerAsAnEventHandler(this);
    }
    // Methods to handle BaseEvents, display either panels, etc.
}
CenterPanel contains one instance of CalendarPanel and PersonPanel. PersonPanel is displayed upon initialising CenterPanel by calling displayPersonPanel().
displayPersonPanel() is also called when BaseEvents related to PersonPanel is received by CenterPanel.
The following code snippet below shows how CenterPanel displays PersonPanel.
public void displayPersonPanel() {
        if (!centerPlaceholder.getChildren().contains(personPanel.getRoot())) {
            centerPlaceholder.getChildren().clear();
            centerPlaceholder.getChildren().add(personPanel.getRoot());
        }
    }
Based on the snippet, CenterPanel checks whether centerPlaceholder contains root node of PersonPanel.
If it does not, centerPlaceholder` will clear any existing child nodes and add root node of PersonPanel, which causes PersonPanel to be displayed.
CenterPanel displays CalendarPanel with displayCalendarPanel(), which is written similar to displayPersonPanel().
CenterPanel subscribes to BaseEvents related to the CalendarPanel and PersonPanel, such as ChangeCalendarPageRequestEvent and PersonPanelSelectionChangedEvent.
Thus, BaseEvents received by CenterPanel can be split into two categories, one meant for CalendarPanel, and the other for PersonPanel.
The following sequence diagram below shows how ChangeCalendarPageRequestEvent is handled by CenterPanel.
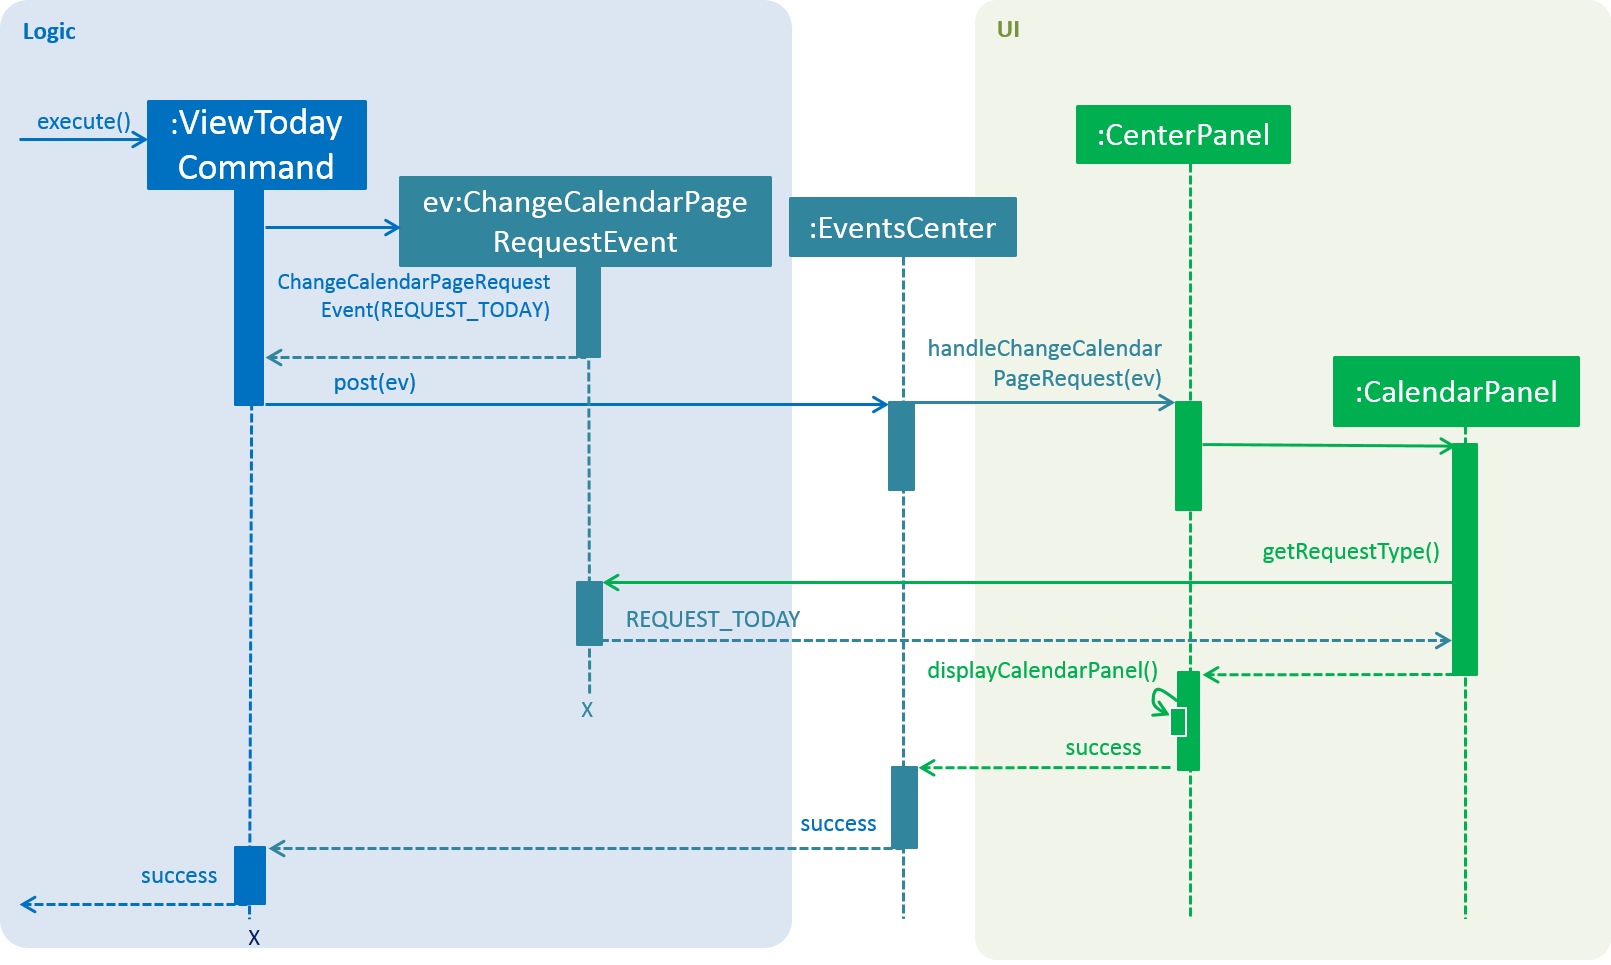
ViewTodayCommand posting ChangeCalendarPageRequestEventIn Figure 36, ViewTodayCommand posts a new ChangeCalendarPageRequestEvent to the EventsCenter.
CenterPanel handles the event by calling handleChangeCalendarPageRequestEvent() in CalendarPanel before calling displayCalendarPanel().
In CalendarPanel, getRequestType() is called on the event to check the page that is requested.
Given that REQUEST_TODAY is the requestType of the event, CalendarView will switch the displayed page to today.
The calendar will be displayed at CenterPanel as control is eventually returned to the user.
4.7.2. Design Considerations
Aspect: Implementation of calendar interface
-
Alternative 1 (current choice): Integrate CalendarFX to display entries while all entry data is stored locally.
-
Pros: Doing so does not require constant Internet access to manage data of Calendar. CalendarFX can also synchronise with certain calendar applications such as Google Calendar. As less code is written to implement it, the effort required to maintain or debug is potentially lesser.
-
Cons: CalendarFX has many features that are currently not used in ContactSails. Developers who intend to use them need to decide and learn how to implement such features by themselves. ContactSails developers cannot customise the calendar itself to implement features not present in the library or modify existing features. Bugs present in the library cannot be easily fixed by non-developers of CalendarFX.
-
-
Alternative 2: Create a calendar using JavaFX to manage entries.
-
Pros: This option offers greater potential for customisation as code is entirely managed by developers.
-
Cons: There is greater probability of bugs created as implementation have to be created from scratch. As compared to using third-party libraries, substantial lines of code has to be written, thus debugging may be harder. Design of features of the calendar have to be decided by developers themselves, which requires more time and effort to implement the features.
-
Aspect: Switching between PersonPanel and CalendarPanel
-
Alternative 1 (current choice): An additional panel,
CenterPanelis used to switch between the two panels.CenterPanelsubscribesBaseEventmeant for the two panels to facilitate the switching of the panels.-
Pros: All
BaseEventsmeant for these two panels can be consolidated in one place. -
Cons: It may not be intuitive for some developers to have
CenterPanelregister forBaseEventmeant forPersonPanelandCalendarPanel.
-
-
Alternative 2:
MainWindowwill subscribe toBaseEventfor the two panels and switch between them accordingly.-
Pros: There is no need to create an additional Class to handle the switching, thus saving the resources and memory required.
-
Cons: This would violate the Single Responsibility Principle and Separation of Concerns as
MainWindowhas to manage other Ui related events such as opening the Help Window.
-
4.8. Configuration
Certain properties of the application can be controlled (e.g App name, logging level) through the configuration file (default: config.json).
5. Documentation
We use asciidoc for writing documentation.
| We chose asciidoc over Markdown because asciidoc, although a bit more complex than Markdown, provides more flexibility in formatting. |
5.1. Editing Documentation
See UsingGradle.adoc to learn how to render .adoc files locally to preview the end result of your edits.
Alternatively, you can download the AsciiDoc plugin for IntelliJ, which allows you to preview the changes you have made to your .adoc files in real-time.
5.2. Publishing Documentation
See UsingTravis.adoc to learn how to deploy GitHub Pages using Travis.
5.3. Converting Documentation to PDF format
We use Google Chrome for converting documentation to PDF format, as Chrome’s PDF engine preserves hyperlinks used in webpages.
Here are the steps to convert the project documentation files to PDF format.
-
Follow the instructions in UsingGradle.adoc to convert the AsciiDoc files in the
docs/directory to HTML format. -
Go to your generated HTML files in the
build/docsfolder, right click on them and selectOpen with→Google Chrome. -
Within Chrome, click on the
Printoption in Chrome’s menu. -
Set the destination to
Save as PDF, then clickSaveto save a copy of the file in PDF format. For best results, use the settings indicated in the screenshot below.

6. Testing
6.1. Running Tests
There are three ways to run tests.
| The most reliable way to run tests is the 3rd one. The first two methods might fail some GUI tests due to platform/resolution-specific idiosyncrasies. |
Method 1: Using IntelliJ JUnit test runner
-
To run all tests, right-click on the
src/test/javafolder and chooseRun 'All Tests' -
To run a subset of tests, you can right-click on a test package, test class, or a test and choose
Run 'ABC'
Method 2: Using Gradle
-
Open a console and run the command
gradlew clean allTests(Mac/Linux:./gradlew clean allTests)
| See UsingGradle.adoc for more info on how to run tests using Gradle. |
Method 3: Using Gradle (headless)
Thanks to the TestFX library we use, our GUI tests can be run in the headless mode. In the headless mode, GUI tests do not show up on the screen. That means the developer can do other things on the Computer while the tests are running.
To run tests in headless mode, open a console and run the command gradlew clean headless allTests (Mac/Linux: ./gradlew clean headless allTests)
6.2. Types of tests
We have two types of tests:
-
GUI Tests - These are tests involving the GUI. They include,
-
System Tests that test the entire App by simulating user actions on the GUI. These are in the
systemtestspackage. -
Unit tests that test the individual components. These are in
seedu.address.uipackage.
-
-
Non-GUI Tests - These are tests not involving the GUI. They include,
-
Unit tests targeting the lowest level methods/classes.
e.g.seedu.address.commons.StringUtilTest -
Integration tests that are checking the integration of multiple code units (those code units are assumed to be working).
e.g.seedu.address.storage.StorageManagerTest -
Hybrids of unit and integration tests. These test are checking multiple code units as well as how the are connected together.
e.g.seedu.address.logic.LogicManagerTest
-
6.3. Troubleshooting Testing
Problem: HelpWindowTest fails with a NullPointerException.
-
Reason: One of its dependencies,
UserGuide.htmlinsrc/main/resources/docsis missing. -
Solution: Execute Gradle task
processResources.
7. Dev Ops
This section covers the build automation tools, coverage reporting tools and other tools used in ContactSails. It also covers the steps required to create new releases and manage dependencies.
7.1. Build Automation
See UsingGradle.adoc to learn how to use Gradle for build automation.
7.2. Continuous Integration
We use Travis CI and AppVeyor to perform Continuous Integration on our projects. See UsingTravis.adoc and UsingAppVeyor.adoc for more details.
7.3. Coverage Reporting
We use Coveralls to track the code coverage of our projects. See UsingCoveralls.adoc for more details.
7.4. Documentation Previews
When a pull request has changes to asciidoc files, you can use Netlify to see a preview of how the HTML version of those asciidoc files will look like when the pull request is merged. See UsingNetlify.adoc for more details.
7.5. Making a Release
Here are the steps to create a new release.
-
Update the version number in
MainApp.java. -
Generate a JAR file using Gradle.
-
Tag the repo with the version number. e.g.
v0.1 -
Create a new release using GitHub and upload the JAR file you created.
7.6. Managing Dependencies
A project often depends on third-party libraries. For example, ContactSails depends on the Jackson library for XML parsing. Managing these dependencies can be automated using Gradle. For example, Gradle can download the dependencies automatically, which is better than these alternatives:
-
Include those libraries in the repo. (this bloats the repo size)
-
Require developers to download those libraries manually. (this creates extra work for developers)
Appendix A: Suggested Programming Tasks to Get Started
Suggested path for new programmers:
-
First, add small local-impact (i.e. the impact of the change does not go beyond the component) enhancements to one component at a time.
-
Next, add a feature that touches multiple components to learn how to implement an end-to-end feature across all components. Section A.1, “Creating a new command:
remark” explains how to go about adding such a feature.
A.1. Creating a new command: remark
By creating this command, you will get a chance to learn how to implement a feature end-to-end, touching all major components of the app.
Scenario: You are a software maintainer for addressbook, as the former developer team has moved on to new projects. The current users of your application have a list of new feature requests that they hope the software will eventually have. The most popular request is to allow adding additional comments/notes about a particular contact, by providing a flexible remark field for each contact, rather than relying on tags alone. After designing the specification for the remark command, you are convinced that this feature is worth implementing. Your job is to implement the remark command.
A.1.1. Description
Edits the remark for a person specified in the INDEX.
Format: remark INDEX r/[REMARK]
Examples:
-
remark 1 r/Likes to drink coffee.
Edits the remark for the first person toLikes to drink coffee. -
remark 1 r/
Removes the remark for the first person.
A.1.2. Step-by-step Instructions
[Step 1] Logic: Teach the app to accept 'remark' which does nothing
Let’s start by teaching the application how to parse a remark command. We will add the logic of remark later.
Main:
-
Add a
RemarkCommandthat extendsUndoableCommand. Upon execution, it should just throw anException. -
Modify
AddressBookParserto accept aRemarkCommand.
Tests:
-
Add
RemarkCommandTestthat tests thatexecuteUndoableCommand()throws an Exception. -
Add new test method to
AddressBookParserTest, which tests that typing "remark" returns an instance ofRemarkCommand.
[Step 2] Logic: Teach the app to accept 'remark' arguments
Let’s teach the application to parse arguments that our remark command will accept. E.g. 1 r/Likes to drink coffee.
Main:
-
Modify
RemarkCommandto take in anIndexandStringand print those two parameters as the error message. -
Add
RemarkCommandParserthat knows how to parse two arguments, one index and one with prefix 'r/'. -
Modify
AddressBookParserto use the newly implementedRemarkCommandParser.
Tests:
-
Modify
RemarkCommandTestto test theRemarkCommand#equals()method. -
Add
RemarkCommandParserTestthat tests different boundary values forRemarkCommandParser. -
Modify
AddressBookParserTestto test that the correct command is generated according to the user input.
[Step 3] Ui: Add a placeholder for remark in PersonCard
Let’s add a placeholder on all our PersonCard s to display a remark for each person later.
Main:
-
Add a
Labelwith any random text insidePersonListCard.fxml. -
Add FXML annotation in
PersonCardto tie the variable to the actual label.
Tests:
-
Modify
PersonCardHandleso that future tests can read the contents of the remark label.
[Step 4] Model: Add Remark class
We have to properly encapsulate the remark in our Person class. Instead of just using a String, let’s follow the conventional class structure that the codebase already uses by adding a Remark class.
Main:
-
Add
Remarkto model component (you can copy fromAddress, remove the regex and change the names accordingly). -
Modify
RemarkCommandto now take in aRemarkinstead of aString.
Tests:
-
Add test for
Remark, to test theRemark#equals()method.
[Step 5] Model: Modify Person to support a Remark field
Now we have the Remark class, we need to actually use it inside Person.
Main:
-
Add
getRemark()inPerson. -
You may assume that the user will not be able to use the
addandeditcommands to modify the remarks field (i.e. the person will be created without a remark). -
Modify
SampleDataUtilto add remarks for the sample data (delete youraddressBook.xmlso that the application will load the sample data when you launch it.)
[Step 6] Storage: Add Remark field to XmlAdaptedPerson class
We now have Remark s for Person s, but they will be gone when we exit the application. Let’s modify XmlAdaptedPerson to include a Remark field so that it will be saved.
Main:
-
Add a new Xml field for
Remark.
Tests:
-
Fix
invalidAndValidPersonAddressBook.xml,typicalPersonsAddressBook.xml,validAddressBook.xmletc., such that the XML tests will not fail due to a missing<remark>element.
[Step 6b] Test: Add withRemark() for PersonBuilder
Since Person can now have a Remark, we should add a helper method to PersonBuilder, so that users are able to create remarks when building a Person.
Tests:
-
Add a new method
withRemark()forPersonBuilder. This method will create a newRemarkfor the person that it is currently building. -
Try and use the method on any sample
PersoninTypicalPersons.
[Step 7] Ui: Connect Remark field to PersonCard
Our remark label in PersonCard is still a placeholder. Let’s bring it to life by binding it with the actual remark field.
Main:
-
Modify
PersonCard's constructor to bind theRemarkfield to thePerson's remark.
Tests:
-
Modify
GuiTestAssert#assertCardDisplaysPerson(…)so that it will compare the now-functioning remark label.
[Step 8] Logic: Implement RemarkCommand#execute() logic
We now have everything set up… but we still can’t modify the remarks. Let’s finish it up by adding in actual logic for our remark command.
Main:
-
Replace the logic in
RemarkCommand#execute()(that currently just throws anException), with the actual logic to modify the remarks of a person.
Tests:
-
Update
RemarkCommandTestto test that theexecute()logic works.
A.1.3. Full Solution
See this PR for the step-by-step solution.
Appendix B: Product Scope
This section states the intended users of ContactSails, the value ContactSails should bring to them and contributions of every developer in the team in regards to developing ContactSails to meet the proposed value.
Target user profile: ContactSails is meant for salespersons from small companies or home-grown businesses with customers from various social media platforms.
A typical user from our target user profile:
-
promotes and sells products or services through social media.
-
works in a small company or runs his/her own business.
-
has limited applications to support their marketing strategies.
-
has a need to manage a large number of contacts.
-
has many contacts spread across many social media platforms such as Facebook, Twitter, Instagram, etc.
-
has many contacts with volatile details.
-
has many contacts that can be grouped together based on type of products purchased by contacts.
-
prefer desktop apps over other types.
-
can type fast.
-
prefers typing over mouse input.
-
is reasonably comfortable using CLI apps.
Value proposition: ContactSails serve as the consolidation platform for all contacts from different platforms for users to communicate with them more easily, analyse and apply their marketing strategies more effectively and efficiently.
Feature Contribution:
-
Aadyaa Maddi
-
Major Feature: Ability to manage customer orders.
-
Orders can be added, edited, and deleted.
-
A list of current orders can be viewed.
-
Orders can also be marked as ongoing or fulfilled.
-
-
Minor Feature: Changing theme of the application.
-
How the above features fit into the product scope:
-
Major Feature: For salespersons, this feature will be essential to have as they would want to keep track of what their customers are ordering and what they have ordered already. If customers have any issues regarding their orders, salespersons will be able to view all the relevant information in a single place.
-
Minor Feature: As a user, the salesperson would want to customise the application to suit their needs.
-
-
-
Alicia Ho Sor Sian
-
Major Feature: Ability to manage entries which are displayed in a calendar.
-
Allows users to add, edit or delete entries, which can represent events or deadlines including order deliveries.
-
Once set, the entry will be displayed in ContactSails' calendar, which shows all incoming events for the current date.
-
The calendar can be displayed in Day-view, Week-view or Month-view, depending on the user.
-
-
Minor Feature: Classifying tags into two categories, groups and preferences.
-
Create 2 distinct categories of tags representing groups that a contact belongs to and preferences that a contact has.
-
Each category is displayed at a separate location in the Ui.
-
-
How the above features fit into the product scope:
-
Major Feature: The calendar can remind salespersons any impending meetings or deadlines especially order deliveries to save time in planning their next course of action carefully. It provides a quicker way to manage events compared to using other calendar applications that mainly relies on GUI input.
-
Minor Feature: Groups can be used to indicate which social media platform does the salesperson use to communicate with a particular contact, while preferences indicates the products and services a contact usually purchases. Using separate labels for groups and preferences placed at separate locations in the Ui display gives a more organised display of a contact’s information, allowing salespersons to derive important information of their contacts quickly.
-
-
-
Ang Jing Zhe
-
Major Feature: Addition of person panel to the user interface.
-
It allows users to see their contacts' information in a neater and more detailed manner.
-
An alternative consideration is to vary the amount of information put up at the panel.
-
-
Minor Feature: Adding colours to tags.
-
Putting colours to tags so that it looks more user friendly.
-
-
How the above features fit into the product scope:
-
Major Feature: Users can see their contacts' information more clearly and neatly.
-
Minor Feature: Colours are more eye-catching and help users to identify different tags.
-
-
-
Kevin Yeong Yu Heng
-
Major Feature: Ability to export contacts and orders to Comma Separated Values formats.
-
Allows user to export contacts to locally stored files.
-
The exported file can integrate in the users' workflow which might include external manipulation of the data such as printing a hardcopy of the contact list or using it in an external spreadsheet software.
-
-
How the above features fit into the product scope:
-
Major Feature: The export facility enables users to use the data from ContactSails to manage contacts and orders, but gives them the option to more easily integrate it to their current work processes which may be through usage of other applications, this allow them to be more efficient in their work.
-
-
Appendix C: User Stories
The following table shows all user stories collected thus far. Priority indicates importance of implementing the user story. Release indicates the version of ContactSails that has already implemented the user story.
Priorities: High (must have) - * * *, Medium (nice to have) - * *, Low (unlikely to have) - *
| Priority | As a … | I want to … | So that I can… | Release |
|---|---|---|---|---|
|
new user |
see usage instructions |
refer to instructions when I forget how to use the App |
1.0 |
|
user |
add a new person |
add new entries |
1.0 |
|
user |
delete a person |
remove entries that I no longer need |
1.0 |
|
user |
find a person by name |
locate details of persons without having to go through the entire list |
1.0 |
|
user |
keep an offline back up |
download and access a local copy of the application data |
2.0 |
|
lazy user |
use short-forms for commands |
execute commands more quickly |
1.0 |
|
task-oriented user |
implement meetings or deadlines for contacts |
keep track of tasks to do for the contacts |
1.3 |
|
organized user |
delete multiple contacts at a time |
remove the contacts I no longer need quickly |
2.0 |
|
user with many contacts |
remove a specific tag |
all contacts with that tag will have the tag removed instead of removing the tag from from every one of them |
1.2 |
|
user with many contacts |
find contacts based on the group they are in |
see all contacts belonging to a certain group |
1.2 |
|
user with many contacts |
sort the contacts by last contacted time |
find contacts I corresponded with recently |
2.0 |
|
salesperson |
view a list of current orders |
keep track of which customers I might need to contact at that point in time |
1.2 |
|
salesperson |
see a list of current customers |
view necessary information about current customers more quickly |
2.0 |
|
salesperson |
send promotions to a group of contacts |
ensure my differentiated marketing strategies work |
2.0 |
|
salesperson |
add a list of preferences to contact |
know what my customers are interested in |
1.2 |
|
salesperson |
edit contact’s preferences |
update my customers' changing interests |
1.2 |
|
salesperson |
see the top preference among all contacts |
know what products I should focus on |
2.0 |
|
salesperson |
edit specific details of contacts |
update my customers' information more conveniently |
1.0 |
|
salesperson |
see top contacts |
divide my attention among my customers as needed |
2.0 |
|
salesperson |
export contacts |
share my customers' public details with concerned businesses |
1.5 |
|
user |
hide private contact details by default |
minimize chance of someone else seeing them by accident |
1.0 |
|
user who prefers visual imagery |
use a calendar to know if there are any tasks or deadlines |
clearer view on how to prioritise my work |
1.3 |
|
user |
access and change my preferred Email Service provider within the ContactSails |
look at my emails and my contacts at the same time |
2.0 |
|
user with many contacts |
synchronise the ContactSails with Google Contacts |
save time importing contacts from Google Contacts |
2.0 |
|
user who is fast at typing |
copy a contact’s email to the clipboard without using a mouse |
save time in emailing a contact |
2.0 |
|
lazy user |
add contact details in any order |
don’t need to remember the order to enter the details |
1.0 |
|
lazy user |
auto-completion of commands |
execute commands quickly |
1.1 |
|
user |
add notes to a contact |
have a clearer description about the contact |
2.0 |
|
user |
group contacts using tags |
categorize my customers as needed |
1.0 |
|
user |
change the theme and font of the application |
personalize my AddressBook |
1.5 |
|
salesperson |
see contact statistics |
more informed about my customer demographic |
2.0 |
|
user with many persons in the address book |
sort persons by name |
locate a person easily |
2.0 |
|
user |
export contacts in different formats |
share contacts to other software |
2.0 |
|
user who likes personalising contacts |
add profile photos to each contact |
recognise the customer easily based on their photo |
2.0 |
|
user |
see a list of tags |
don’t need to remember all existing tags |
2.0 |
Appendix D: Use Cases
The below use cases indicate how ContactSails and its users should interact in each use case.
(For all use cases below, the System is the ContactSails and the Actor is the user, unless specified otherwise)
Use case: Delete person
MSS
-
User requests to list persons.
-
ContactSails shows a list of persons.
-
User requests to delete a specific person in the list.
-
ContactSails deletes the person.
Use case ends.
Extensions
-
2a. The list is empty.
Use case ends.
-
3a. The given index is invalid.
-
3a1. ContactSails shows an error message.
Use case resumes at step 2.
-
Use case: Add person
MSS
-
User requests to add specific person.
-
ContactSails adds the person.
Use case ends.
Extensions
-
1a. User enters invalid format for the Add feature.
-
1a1. ContactSails shows an error message.
Use case ends.
-
-
1b. User enters exact details of person existing in ContactSails.
-
1b1. ContactSails shows an error message.
Use case ends.
-
Use case: List current customers
MSS
-
User requests for current customers.
-
ContactSails finds and displays a list of the list of customers whose orders are currently being fulfilled by user.
Use case ends.
Extensions
-
2a. The list is empty as there are no current orders.
-
2a1. ContactSails shows an error message.
Use case ends.
-
Use case: Edit specific details of contacts
MSS
-
User selects contact to edit from the current list of contacts.
-
ContactSails shows the selected contact.
-
User requests to edit a certain field of the contact.
-
ContactSails updates the contact details and shows contact details after the changes made.
Use case ends.
Extensions
-
1a. User selects invalid contact.
-
1a1. ContactSails shows an error message.
Use case ends.
-
-
2a. User selects invalid field to edit.
-
2a1. ContactSails shows an error message.
Use case resumes at step 2.
-
Use case: Add notes to contacts
MSS
-
User requests to list persons.
-
ContactSails shows a list of persons.
-
User requests to add notes to specific person in the list.
-
ContactSails adds notes to the specified person.
Use case ends.
Extensions
-
2a. The list is empty.
Use case ends.
-
3a. The given index is invalid.
-
3a1. ContactSails shows an error message.
Use case resumes at step 2.
-
Use case: Add calendar entry
MSS
-
User requests to add an entry with specified details.
-
ContactSails adds entry to list of entries.
Use case ends.
Extensions
-
1a. User adds entry with invalid details.
-
1a1. ContactSails shows an error message.
Use case ends.
-
-
1b. User enters duplicate entry.
-
1b1. ContactSails shows an error message.
Use case ends.
-
Use case: Delete calendar entry
MSS
-
User requests to delete an entry at specified index of entry list.
-
ContactSails deletes the entry at specified index.
Use case ends.
Extensions
-
1a. User gives invalid index.
-
1a1. ContactSails shows an error message.
Use case ends.
-
Use case: Find persons by name
MSS
-
User requests to find persons with specific names.
-
ContactSails shows list of persons with specified names.
Use case ends.
Extensions
-
1a. User does not specify any name.
-
1a1. ContactSails shows an error message.
Use case ends.
-
-
1b. ContactSails does not have any names specified by user.
-
1b1. ContactSails shows empty list.
Use case ends.
-
Use case: Find persons by groups
MSS
-
User requests to find persons with specific groups.
-
ContactSails shows list of persons with specified groups.
Use case ends.
Extensions
-
1a. User does not specify any group.
-
1a1. ContactSails shows an error message.
Use case ends.
-
-
1b. ContactSails does not have any groups specified by user.
-
1b1. ContactSails shows empty list.
Use case ends.
-
Use case: Find persons by preferences
MSS
-
User requests to find persons with specific preferences.
-
ContactSails shows list of persons with specified preferences.
Use case ends.
Extensions
-
1a. User does not specify any preference.
-
1a1. ContactSails shows an error message.
Use case ends.
-
-
1b. ContactSails does not have any preference specified by user.
-
1b1. ContactSails shows empty list.
Use case ends.
-
Use case: Remove specific group
MSS
-
User requests to remove a group and enters group they want to remove.
-
ContactSails removes the specific group from all contacts who have this group assigned to them.
Use case ends.
Extensions
-
2a. There are no groups.
-
2a1. ContactSails shows an error message.
Use case ends.
-
-
2a. User enters invalid group.
-
2a1. ContactSails shows an error message.
Use case resumes at step 1.
-
Use case: Remove specific preference
MSS
-
User requests to remove a preference enters the preference they want to remove.
-
ContactSails removes the specific preference from all contacts who have this group assigned to them.
Use case ends.
Extensions
-
2a. There are no preferences.
-
2a1. ContactSails shows an error message.
Use case ends.
-
-
2a. User enters invalid preference.
-
2a1. ContactSails shows an error message.
Use case resumes at step 1.
-
Use case: Add order
MSS
-
User requests to add order to a specific person.
-
ContactSails adds the order.
Use case ends.
Extensions
-
1a. User enters invalid format for the AddOrder command.
-
1a1. ContactSails shows an error message.
Use case ends.
-
-
1a. User adds a duplicate order.
-
1a1. ContactSails shows an error message.
Use case ends.
-
Use case: Delete order
MSS
-
User requests to list orders.
-
ContactSails shows a list of orders.
-
User requests to delete a specific order in the list.
-
ContactSails deletes the order from the application.
Use case ends.
Extensions
-
2a. The list is empty.
Use case ends.
-
3a. The given index is invalid.
-
3a1. ContactSails shows an error message.
Use case resumes at step 2.
-
Use case: Export contacts
MSS
-
User selects contacts to export from the current list of contacts.
-
ContactSails stores the selection and processes the contacts to export.
-
User requests to create a file containing the selected contacts.
-
ContactSails creates the file and prompts for save location of file.
-
User specifies location of file to be saved.
-
ContactSails saves the file and shows a success message.
Use case ends.
Extensions
-
1a. User does not select any contact.
-
1a1. ContactSails shows an error message.
Use case ends.
-
-
1b. User makes an invalid selection.
-
1b1. ContactSails shows an error message.
Use case ends.
-
-
4a. ContactSails is unable to create the file with selected contacts.
-
4a1. ContactSails shows an error message.
Use case resumes at step 1.
-
-
6a. ContactSails is unable to save the file in the specified location.
-
6a1. ContactSails shows an error message.
Use case resumes at step 5.
-
-
*a. User cancels the operation at any time.
-
*a1. ContactSails shows an error message.
Use case ends.
-
Use case: Store a local backup of contacts
MSS
-
User requests to create a backup file containing all the data stored in the application.
-
ContactSails prompts user to indicate save location.
-
User specifies location of file to be saved.
-
ContactSails saves the file in the location specified and shows a success message.
Use case ends.
Extensions
-
2a. ContactSails is unable to create the file.
-
2a1. ContactSails shows an error message.
Use case ends.
-
-
4a. ContactSails is unable to save the file in the specified location.
-
4a1. ContactSails shows an error message.
Use case resumes at step 3.
-
Appendix E: Non Functional Requirements
The requirements indicate the constraints that ContactSails have to be developed with.
-
ContactSails should work on any mainstream OS as long as it has Java
1.8.0_60or higher installed. -
ContactSails should be able to hold up to 1000 persons without a noticeable sluggishness in performance for typical usage.
-
A user with above average typing speed for regular English text (i.e. not code, not system admin commands) should be able to accomplish most of the tasks faster using commands than using the mouse.
-
ContactSails should be usable even for users without experience in using command line applications.
-
Users should be able to download ContactSails for free as ContactSails is modified from an open-source software.
-
ContactSails should continue to run the original, intended functions, even when problems occur during execution.
-
In sessions when ContactSails has crashed, changes made to it during those sessions should not be lost.
-
Size of ContactSails should not exceed 1GB even with many contacts stored in it (maximum number of contacts allowed is 1000)
-
ContactSails should take up to 2 seconds to execute any command except for commands that are reliant on internet connectivity.
-
ContactSails can still work even if there is limited internet connectivity when executed commands open websites.
-
Users can use ContactSails without requiring an installer.
-
Data of ContactSails should be stored locally and in a human editable text file.
-
Data of ContactSails should be able to be encrypted such that only the user can see it when text file containing the data is directly accessed.
-
ContactSails should not be required to print any detailed reports of contacts.
Appendix F: Glossary
- Mainstream OS
-
Windows, Linux, Unix, OS-X
- Contacts
-
People whose details are present in ContactSails.
- Private contact detail
-
A contact detail that is not meant to be shared with others.
- Group
-
A label attached to a person’s contact information for the purpose of grouping persons.
- Preference
-
A label attached to a person’s contact information for the purpose of providing more specific details of person’s interests.
- Tasks
-
A deadline, reminder, or a general note that can be added to keep track of things needed to be done.
- MSS
-
Represents the most straightforward interaction between System and User where nothing goes wrong, in a use case.
- Extensions
-
Represents interactions between System and User where something might have gone wrong.
- Profile Photo
-
A photograph attached to a certain contact to represent the person.
- Backup File
-
An XML data file that stores all data in the application in a local copy on my computer.
- Java FX
-
A software platform that contains a set of packages for graphics that enables developers to develop rich cross-platform applications.
- Travis
-
A hosted, distributed continuous integration service used to build and test software projects hosted at GitHub on a Linux virtual machine.
- AppVeyor
-
A hosted, distributed continuous integration service used to build and test software projects hosted at GitHub on a Windows virtual machine.
Appendix G: Product Survey
The following indicates the structure that product surveys should have.
Product Name
Author: …
Pros:
-
…
-
…
Cons:
-
…
-
…
Appendix H: Instructions for Manual Testing
Given below are instructions to test the app manually.
| These instructions only provide a starting point for testers to work on; testers are expected to do more exploratory testing. |
H.1. Launch and Shutdown
-
Initial launch
-
Download the jar file and copy into an empty folder.
-
Double-click the jar file.
Expected: Shows the GUI with a set of sample contacts. The window size may not be optimum.
-
-
Saving window preferences
-
Resize the window to an optimum size. Move the window to a different location. Close the window.
-
Re-launch the app by double-clicking the jar file.
Expected: The most recent window size and location is retained.
-
H.2. Deleting a person
-
Deleting a person while all persons are listed
-
Prerequisites:
-
List all persons using the
listcommand. -
There should be multiple persons in the list.
-
-
Test case:
delete 1
Expected: First contact is deleted from the list. Details of the deleted contact shown in the status message. Timestamp in the status bar is updated. -
Test case:
delete 0
Expected: No person is deleted. Error details shown in the status message. Status bar remains the same. -
Other incorrect
deletecommands to try:-
delete(no index specified) -
delete x(where x is larger than the list size)
Expected: Similar to previous.
-
-
H.3. Adding an Order
-
Adding an order
-
Prerequisites:
-
List persons using the
listorfindcommands. -
There should be at least one person listed.
-
-
Test case:
orderadd 1 i/NBA 2k18 pr/59.99 q/1 d/14-04-2018
Expected: Order is added to order list and displayed. Details of the added order shown in the status message. Timestamp in the status bar is updated. -
Test case:
orderadd 1 i/NBA 2k18 pr/59.99 q/1 d/14-04-2018
Expected: Duplicate order is not added. Error details shown in the status message. Status bar remains the same. -
Other incorrect
orderaddcommands to try:-
orderadd 1 pr/59.99 q/1 d/14-04-2018(compulsory field missing) -
orderadd 1 i/NBA 2k18 pr/12.34.56 q/1 d/14-04-2018(invalid price) -
orderadd 1 i/NBA 2k18 pr/59.99 q/1 d/29-02-2018(invalid date) -
orderadd 2 i/NBA 2k18 pr/59.99 q/1 d/14-04-2018(duplicate order not added to different person)
Expected: Similar to previous.
-
-
H.4. Editing an Order
-
Editing an order
-
Prerequisites:
-
List orders using the
orderlistcommand. -
There should be at least one order listed.
-
-
Test case:
orderedit 1 q/10 d/16-04-2018
Expected: Order in order list is edited and and updated order is displayed. Details of the edited order shown in the status message. Timestamp in the status bar is updated. -
Test case:
orderedit 2 i/NBA 2k18 pr/59.99 q/1 d/16-04-2018
Expected: Assuming you have successfully edited theNBA 2k18order with the command in Step 1.b., this command will not execute as it would result in a duplicate order. Error details shown in the status message. Status bar remains the same. -
Other incorrect
ordereditcommands to try:-
orderedit 1 pr/12.34.56(invalid price) -
orderedit 1 d/29-02-2018(invalid date) -
orderedit x q/15(where x is larger than the list size)
Expected: Similar to previous.
-
-
H.5. Changing Order Status
-
Changing status of an order
-
Prerequisites:
-
List orders using the
orderlistcommand. -
There should be at least one order listed.
-
-
Test case:
orderstatus 1 os/done(if the current order status isongoing)
Expected: Order status of order is updated and and order card colour is changed to green. Success message shown in the status message. Timestamp in the status bar is updated. -
Test case:
orderstatus 1 os/ongoing(if the current order status isdone)
Expected: Order status of order is updated and and order card colour is changed to red. Success message shown in the status message. Timestamp in the status bar is updated. -
Test case:
orderstatus 1 os/fulfilled
Expected: Order status not updated. Error details shown in the status message. Status bar remains the same. -
Other incorrect
orderstatuscommands to try:-
orderstatus 1 os/(empty status) -
orderstatus x os/done(where x is larger than the list size)
Expected: Similar to previous.
-
-
H.6. Deleting an Order
-
Deleting an order
-
Prerequisites:
-
List orders using the
orderlistcommand. -
There should be at least one order listed.
-
-
Test case:
orderdelete 1
Expected: Order is deleted. Details of deleted order shown in the status message. Timestamp in the status bar is updated. -
Test case:
orderdelete 0
Expected: No order is deleted. Error details shown in the status message. Status bar remains the same. -
Other incorrect
orderdeletecommands to try:-
orderdelete(no index specified) -
orderdelete x(where x is larger than the list size)
Expected: Similar to previous.
-
-
H.7. Changing the Theme
-
Changing to light theme
-
Prerequisites:
-
Current theme should not be the light theme.
-
Use
theme darkto switch to the dark theme.
-
-
Test case:
theme light
Expected: Theme changed to light version. Success message shown in status message. Status bar is not updated. -
Test case:
theme day
Expected: Theme not changed. Error details shown in the status message. Status bar remains the same. -
Other incorrect
themecommands to try:-
theme(no version specified)
Expected: Similar to previous.
-
-
-
Changing to dark theme
-
Prerequisites:
-
Current theme should not be the dark theme.
-
Use
theme lightto switch to the light theme.
-
-
Test case:
theme dark
Expected: Theme changed to dark version. Success message shown in status message. Status bar is not updated. -
Test case:
theme night
Expected: Theme not changed. Error details shown in the status message. Status bar remains the same. -
Other incorrect
themecommands to try:-
theme(no version specified)
Expected: Similar to previous.
-
-
H.8. Adding a Calendar Entry
-
Adding a Calendar Entry
-
Prerequisites:
-
List calendar entries using the
entrylistcommand.
-
-
Test case:
entryadd t/Meet with Supplier sd/04-04-2018 ed/04-04-2018 st/10:00 et/12:00
Expected: Calendar Entry is added to the Calendar Entry List, appearing at the last index. Details of the added calendar entry shown in the status message. Calendar is displayed. Timestamp in the status bar is updated. -
Test case:
entryadd t/Meet with Supplier sd/04-04-2018 ed/04-04-2018 st/10:00 et/12:00
Expected: Duplicate calendar entry is not added. Error details shown in the status message. Status bar remains the same. -
Other incorrect
entryaddcommands to try:-
entryadd sd/10-04-2018 st/10:00 et/12:30(compulsory fields missing) -
entryadd t/Get Books et/10:00 ed/14.04.2018(invalid date format) -
entryadd t/Get Car et/2359 ed/14-04-2018(invalid time format) -
entryadd t/RoadShow at Orchard sd/04-05-2018 ed/05-05-2018 st/23:50 et/00:01(duration of entry must be at least 15 minutes)
Expected: Similar to previous.
-
-
H.9. Deleting a Calendar Entry
-
Deleting a Calendar Entry
-
Prerequisites:
-
List calendar entries using the
entrylistcommand. -
There should be at least one calendar entry listed.
-
-
Test case:
entrydelete 1
Expected: Calendar entry is deleted. Details of deleted calendar entry shown in the status message. Timestamp in the status bar is updated. -
Test case:
entrydelete 0
Expected: No calendar entry is deleted. Error details shown in the status message. Status bar remains the same. -
Other incorrect
entrydeletecommands to try:-
entrydelete(no index specified) -
entrydelete x(where x is larger than the list size)
Expected: Similar to previous.
-
-
H.10. Editing a Calendar Entry
-
Editing a Calendar Entry
-
Prerequisites:
-
List calendar entries using the
entrylistcommand. -
There should be at least one calendar entry listed.
-
-
Test case:
entryedit 1 t/Meet with Bosses
Expected: Calendar entry in calendar entry list is edited and and updated calendar entry is displayed. Details of the edited calendar entry is shown in the status message. Timestamp in the status bar is updated. -
Incorrect
entryeditcommands to try:-
entryedit 1 sd/07-06-2018 ed/06-05-2018(invalid dates, start date cannot be later than end date) -
entryedit 1 sd/07-07-2018 ed/07-07-2018 st/12:00 et/08:00(invalid times, start time cannot be later than end time for entries ending on the same date) -
entryedit x t/Stakeholder Meeting(where x is larger than the list size)
Expected: Command will fail to execute. Error details shown in the status message. Status bar remains the same.
-
-
H.11. Changing Calendar View
-
Changing Calendar View
-
Prerequisites:
-
Calendar is displayed at center of interface, displaying in Day-view.
-
-
Test case:
calendar month
Expected: Calendar will change its current view to Month-view. Details of current view of calendar will be displayed in status message. -
Correct
calendarcommands to try:-
calendar week(Calendar will display in Week-view) -
calendar(Calendar will display in Day-view if no parameter is given) -
`calendar x@@ ` (Calendar will display in Day-view even if invalid parameters are entered)
Expected: Same as previous
-
-
H.12. Changing displayed date in Calendar
-
Changing displayed date in Calendar
-
Prerequisites:
-
Calendar is displayed at center of interface, displaying in Day-view.
-
-
Test case:
calendarjump td/05-05-2018
Expected: Calendar will change its displayed date to 05-05-2018. Details of current date of calendar will be displayed in status message. -
Incorrect
calendarjumpcommands to try:-
calendarjump 04/04/2018(No prefix is present) -
calendarjump td/04.04.2018(Wrong format for date) -
`calendarjump x@@ ` (invalid parameters are entered)
Expected: Command will fail to execute. Error details shown in the status message. Status bar remains the same.
-
-
H.13. Changing displayed page in Calendar
-
Changing displayed page in Calendar
-
Prerequisites:
-
Calendar is displayed at center of interface, displaying in Day-view.
-
-
Test case:
calendarnext
Expected: Calendar will change its displayed date to the next day (if Day-view is displayed). Command result will be displayed in status message, indicating that calendar has displayed the next page.
-